In software development using the Adobe Experience Manager (AEM) platform and be hosted on Adobe Cloud, it is customary to segregate environments. These include Non-Production (for development) and Production (comprising Staging and Production stages). Utilizing Adobe Cloud environment variables enables dynamic configuration tailored to each environment, preventing configuration overlaps and ensuring seamless operations across different environments.
I. Understanding CI/CD Pipeline of Adobe Cloud
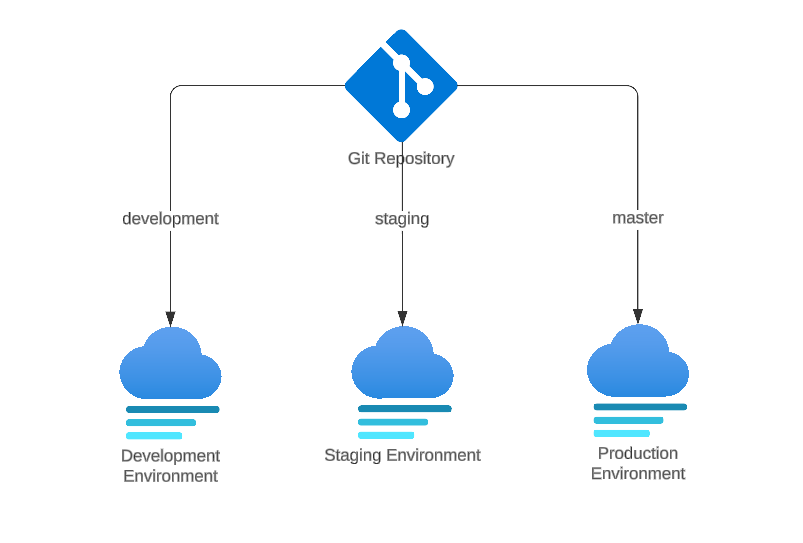
In AEM, we categorize environments into three types: Production + Stage, Development, and Rapid Development. For instance, these environments are delineated as follows:
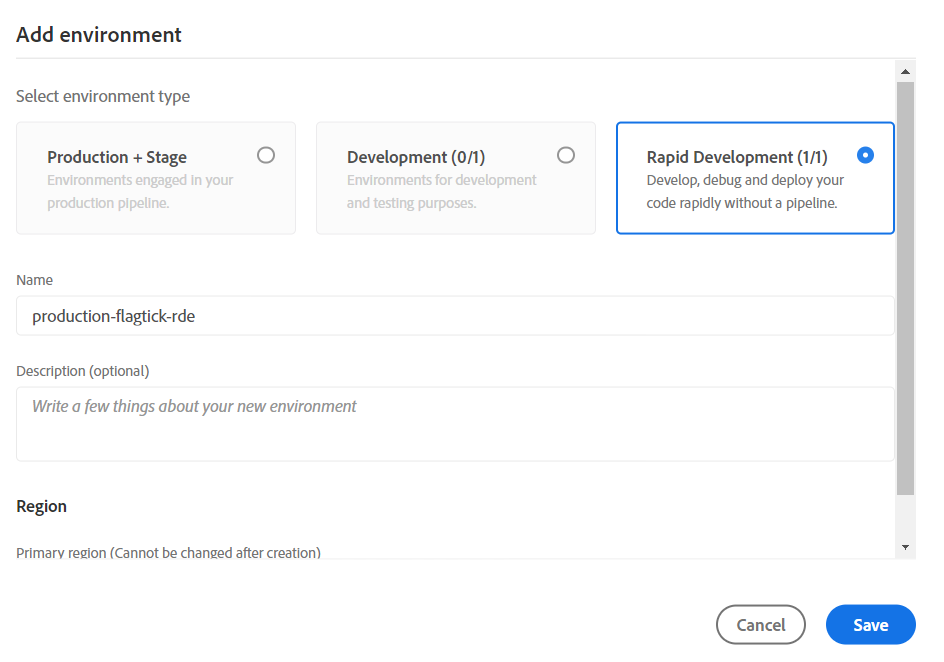
Assuming we select Production + Stage and Development, the results will be as follows:

When devising Adobe Cloud Manager CI/CD Pipelines, we will bifurcate into two branches: one directing to Production + Stage environment type, and the other to Development, leading to Non-Production.
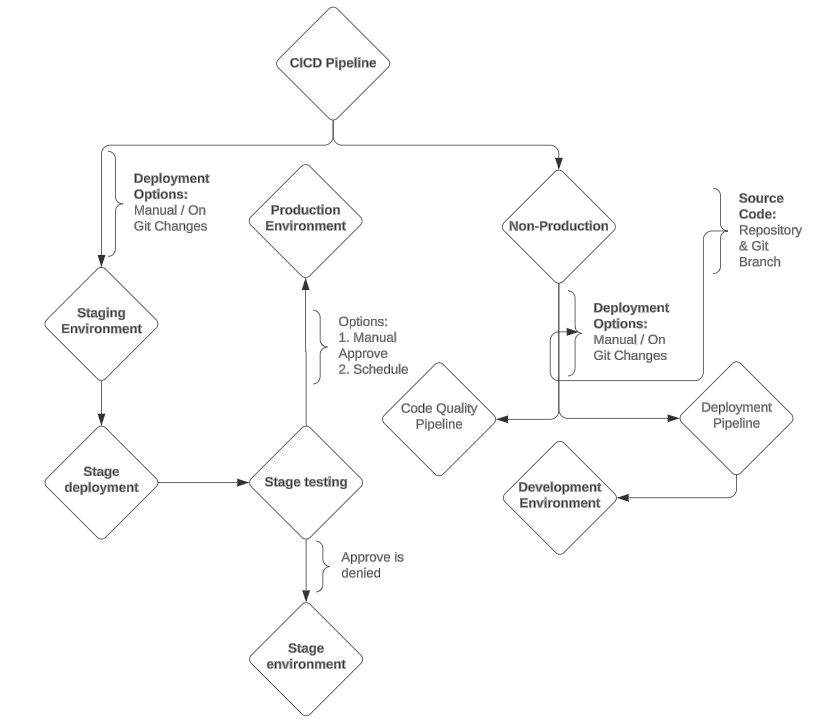
Note: In general, the configuration for Non-Production and Production will be identical. However, in Production, we will have two associated environments: Staging and Production. In practice, the branch running on Staging may be the same as or different from Production. For Non-Production, we only have the development environment.
Run the Production Pipeline trigger to assess its impact on both the staging and production environments.

Navigate to the overflow menu in the Environments tab to determine the number of options displayed. These options will provide insights into their respective purposes.
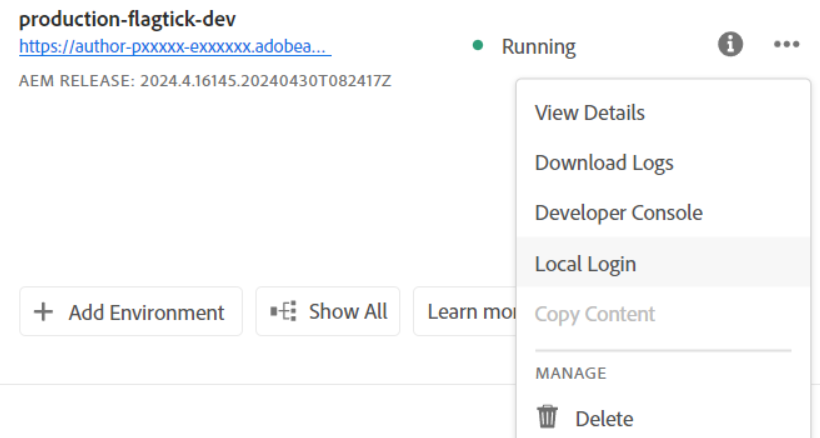
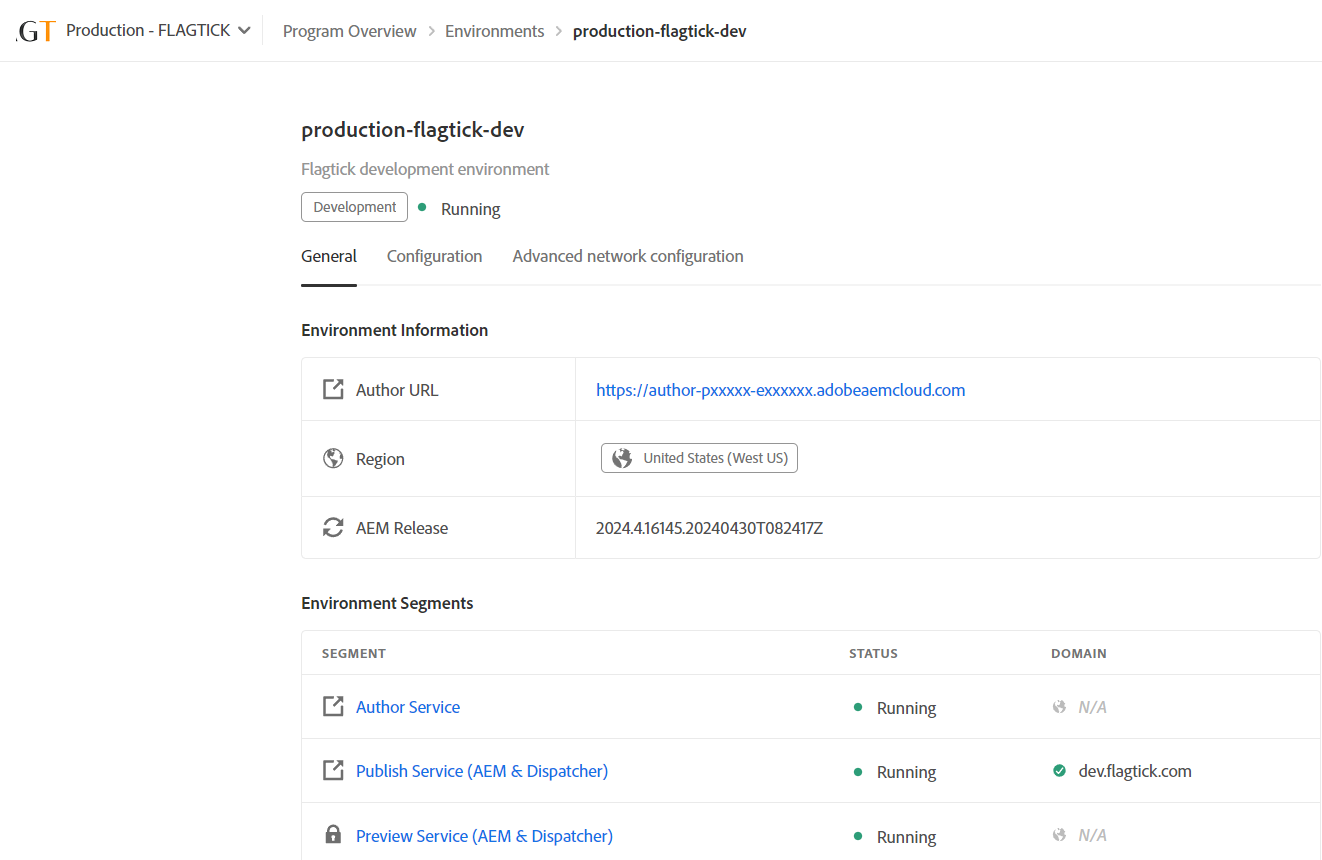
» View Details: Reveal endpoints connecting to both the author and publish instances in Development environment. This option also includes configuration settings where you can set up Adobe Cloud environment variables. Additionally, explore the `Advanced network configuration` to further customize settings such as email configurations within Adobe Cloud.
» Download Logs: Retrieve logs stored in the Adobe Cloud, which are typically retained for approximately 7 days. These logs encompass all services within each environment and target specific instances, including author, publish, or dispatcher. Here is an example:

Note: If you need solutions for downloading logs from the Adobe Cloud to maintain your AEM site, monitor all services, or store logs for other purposes, click the URL here for further information.
» Developer Console: know as the Felix Console. Here, you can access information about the status of components, bundles, and OSGi services. Additionally, explore Java packages, servlets, queries, integrations, and the repository browser.

Note: The Repository Browser in AEM Cloud is akin to CRXDE | Lite.

Local Login: This option allows you to access the author instance and confirm your permissions in Adobe Cloud. It is akin to logging into the AEM instance locally.

In the overflow menu of Pipelines, select `Edit` for the Production Pipeline. Within the menu, you will find the Production Deployment Options, allowing you to trigger replication from staging to production environments or halt the process in staging only.
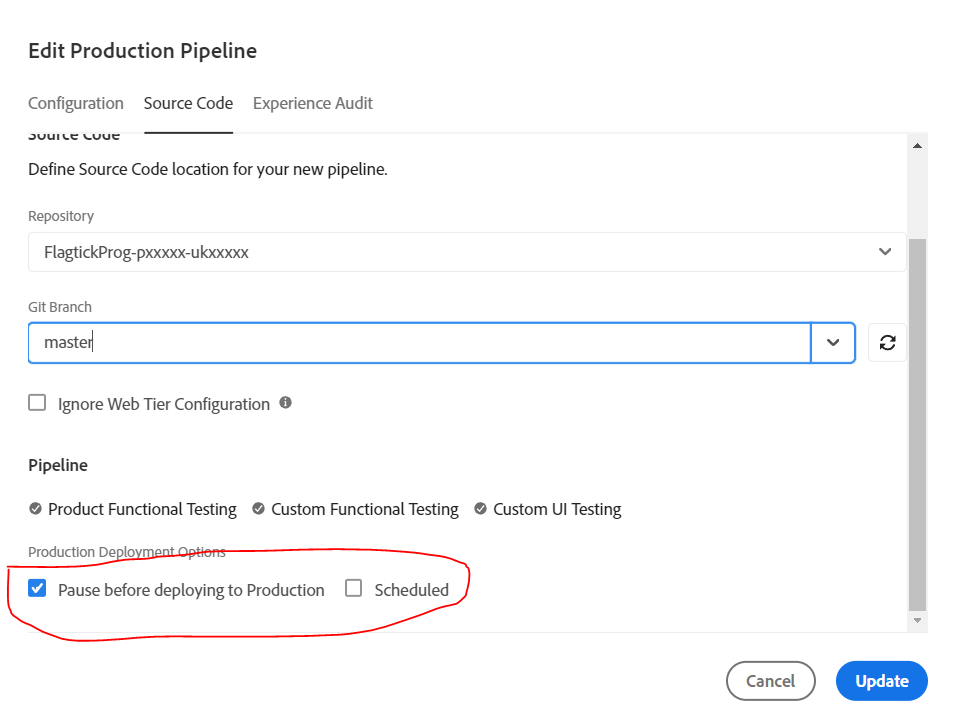
Note: The Non-Production Pipeline does not offer Production Deployment Options, ensuring clear separation between Development, Staging, and Production environments. This streamlined approach minimizes impacts on Staging and Production while facilitating the easy development of new features on Development environment.
II. Use Environment Variables in AEM as a Cloud Service
Let us take a moment to analyze our issue. As you are aware, one of Adobe's routine tasks is performing maintenance updates for AEM on Adobe Cloud. Following these updates, they automatically execute processes to run the `master` branch through the Production Pipeline, testing for any potential issues on the staging environment before deploying to the Production environment. Here is an example:

We have structured the links to branches for each environment as shown below.
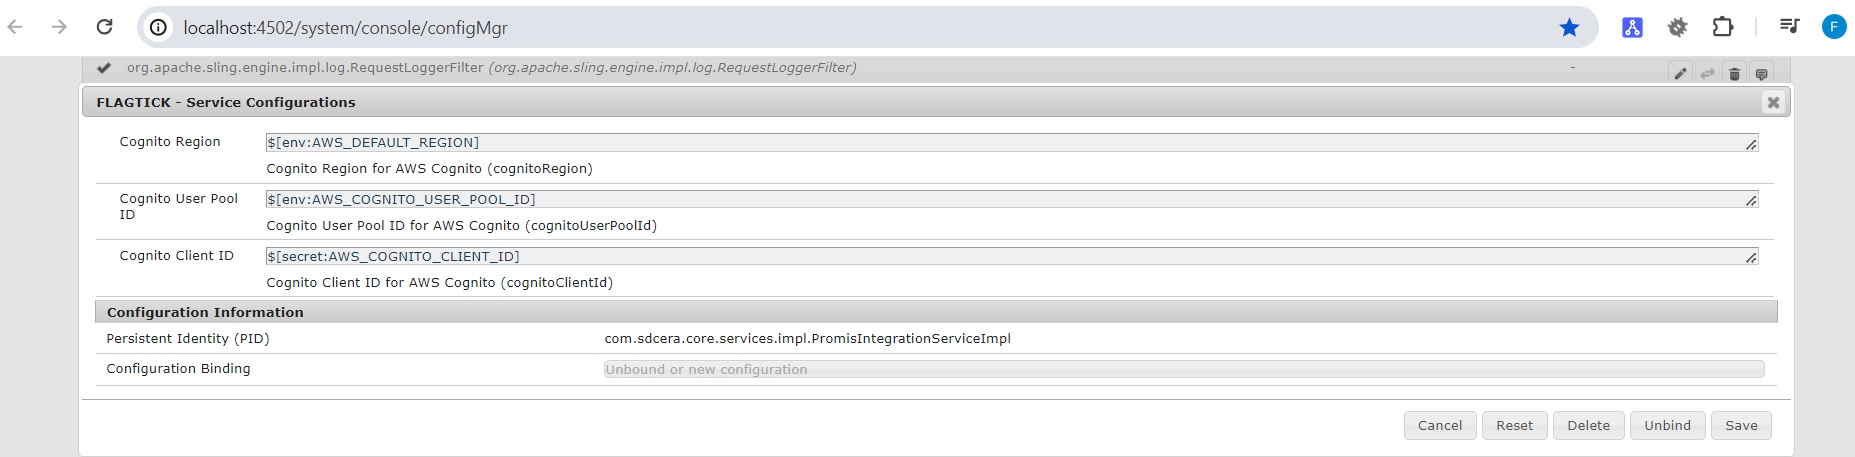
Let us assume that we are using the development environment for this test. Begin by navigating to Configuration and attempt to set up three parameters: AWS_DEFAULT_REGION, AWS_COGNITO_USER_POOL_ID, and AWS_COGNITO_CLIENT_ID as Adobe Cloud environment variables.

Note: Closely observe the options available here. Firstly, the SERVICE APPLIED specifies which instance you intend to target, such as All, Author, Publish, and Preview. Similarly, there are two options for TYPE: Variable and Secret. Note that selecting `Secret` will encrypt the value using *.
Next, let us delve into OSGi configurations within the AEM project. Here, we will modify OSGi configuration files, which are JSON-based and use the format .cfg.json as defined by the Apache Sling project.
- In your Integrated Development Environment (IDE), navigate to the ui.config project. Locate or create the config folder (/ui.config/.../config.<runmode>) that corresponds to the runmodes where the new OSGi configuration needs to take effect.
├───jcr_root
│   └───apps
│       └───flagtick
│           └───osgiconfig
│               ├───config
│               │       com.flagtick.core.services.impl.FlagtickIntegrationServiceImpl.cfg.json
│
└───META-INF
    └───vault
            filter.xml
» FlagtickIntegrationServiceImpl.cfg.json
{
  "cognitoRegion": "$[env:AWS_DEFAULT_REGION]",
  "cognitoUserPoolId": "$[env:AWS_COGNITO_USER_POOL_ID]",
  "cognitoClientId": "$[secret:AWS_COGNITO_CLIENT_ID]"
}
» filter.xml
<?xml version="1.0" encoding="UTF-8"?>
<workspaceFilter version="1.0">
    <filter root="/apps/flagtick/osgiconfig"/>
</workspaceFilter>
» FlagtickIntegrationServiceImpl.java
package com.flagtick.core.services.impl;

@Component(
        immediate = true,
        service = FlagtickIntegrationService.class
)
@Designate(ocd = FlagtickIntegrationServiceImpl.Config.class)
public class FlagtickIntegrationServiceImpl implements FlagtickIntegrationService {

    @ObjectClassDefinition(
            name = "FLAGTICK - Service Configurations",
            description = "Gateway Service Configurations"
    )
    protected @interface Config {

        @AttributeDefinition(
                name = "Cognito Region",
                description = "Cognito Region for Adobe Cloud",
                type = AttributeType.STRING
        )
        String cognitoRegion();
		@AttributeDefinition(
                name = "Cognito User Pool ID",
                description = "Cognito User Pool ID for Adobe Cloud",
                type = AttributeType.STRING
        )
        String cognitoUserPoolId();
		@AttributeDefinition(
                name = "Cognito Client ID",
                description = "Cognito Client ID for Adobe Cloud",
                type = AttributeType.STRING
        )
        String cognitoClientId();
    }
}
Once you have successfully completed this step, run mvn -PautoInstallPackage -Padobe-public clean install to build the AEM project. After that, log in to the AEM Felix Console at `https://<host>:<port>/system/console` using the admin user credentials.
In practice, you will push the code to the Git repository in the Adobe Cloud. From there, you can trigger either the Non-Production Pipeline or Production Pipeline to set up the OSGi configuration in the Adobe Cloud environment. To confirm the successful setup, use the Developer Console by navigating to Pod » Status » Configurations and selecting `Get Status`.

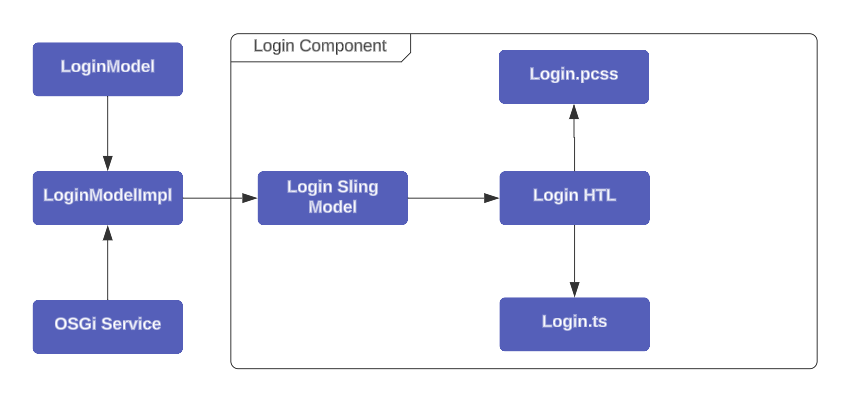
Use the `FlagtickIntegrationService.java` interface to transfer Cognito configuration settings from OSGi configuration to the Sling Servlet and Sling Model. This allows passing the configuration data to the `ui.front-end` module.
» FlagtickIntegrationService.java
package com.flagtick.core.services;

import java.util.List;
import java.util.Map;

public interface PromisIntegrationService {
	String getCognitoRegion();

    String getCognitoUserPoolId();

    String getCognitoClientId();
}
III. Implement Dynamic Configuration AEM Front-end
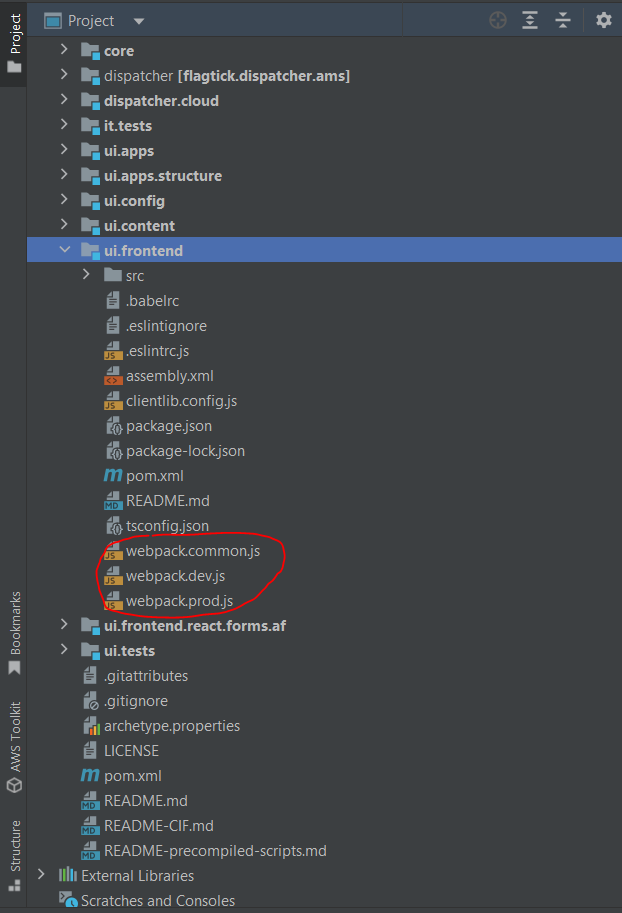
The AEM Front-end module is pivotal in AEM component development, furnishing templates, JavaScript, and styles for each component. Nowadays, when initiating AEM project with Maven archetype, it often incorporates webpack configuration file. This file, typically named `webpack.common.js`, allows users to conveniently access and modify common configurations, such as Cognito settings.
Suppose you have front-end application written in JavaScript, and you are using webpack as the bundler. You want to configure AWS Cognito settings such as the region, user pool ID, and client ID. You can define these settings as constants using webpack's DefinePlugin.
» webpack.common.js
const _DefinePlugin = require('webpack').DefinePlugin;

module.exports = {
  // Other webpack configuration options...

  plugins: [
    new _DefinePlugin({
      AWS_COGNITO_REGION: JSON.stringify(process.env.AWS_COGNITO_REGION),
      AWS_COGNITO_USER_POOL_ID: JSON.stringify(process.env.AWS_COGNITO_USER_POOL_ID),
      AWS_COGNITO_CLIENT_ID: JSON.stringify(process.env.AWS_COGNITO_CLIENT_ID),
    }),
  ],
};
In Node.js and many other environments, `process.env` is an object that contains the user environment. It allows access to environment variables as properties.
» .env
AWS_COGNITO_REGION = <region>
AWS_COGNITO_USER_POOL_ID = <pool id>
AWS_COGNITO_CLIENT_ID = <client id>
For detailed instructions on creating servlet path (without using servlet resource type) to load Cognito configuration from the backend and retrieve it from OSGi Configuration files, visit this link.

Let create the `CognitoPlugin.js` file with a custom webpack plugin to load Cognito configuration from an API endpoint and define corresponding constants in your webpack build using DefinePlugin.
» CognitoPlugin.js
const fetch = require('node-fetch');
const webpack = require('webpack');

class CognitoPlugin {

  constructor(apiEndpoint) {
    this.apiEndpoint = apiEndpoint;
  }

  apply(compiler) {
    compiler.hooks.environment.tap('CognitoPlugin', () => {
      const absoluteUrl = 'http://localhost:4503' + this.apiEndpoint;
      fetch(absoluteUrl)
        .then(response => response.json())
        .then(configData => {
          compiler.options.plugins.push(
            new webpack.DefinePlugin({
              COGNITO_REGION: JSON.stringify(configData.region),
              COGNITO_USER_POOL_ID: JSON.stringify(configData.userPoolId),
              COGNITO_CLIENT_ID: JSON.stringify(configData.clientId),
            })
          );
        })
        .catch(error => {
          console.error('Error loading Cognito configuration:', error);
        });
    });
  }
}

module.exports = CognitoPlugin;
Within the `webpack.plugin.js` file, you will find the implementation of `CognitoPlugin.js` as depicted below.
» webpack.plugin.js
const _CognitoPlugin = require('./CognitoPlugin');

const CognitoPlugin = new _CognitoPlugin('/bin/cognito/config');

module.exports = [
    CognitoPlugin,
    ...
];
Note: In reality, when running npm run dev with this implementation for dynamic Cognito configuration, fetching the configuration from an API endpoint may introduce latency, especially if the endpoint is hosted remotely. Therefore, it is important to ensure that the absolute path used as the API endpoint is accessible and responsive.
IV. Invoke OSGi Services Through Sling Models Using Annotations
We will conduct brief analysis to remove the Cognito configuration from webpack. By utilizing the DefinePlugin, we can globally expose AWS_COGNITO_REGION, AWS_COGNITO_USER_POOL_ID, and AWS_COGNITO_CLIENT_ID variables within your TypeScript application. To achieve this, you must declare these variables in a TypeScript declaration file (`.d.ts`).
» Cognito.d.ts
declare global {
  const AWS_COGNITO_REGION : string;
  const AWS_COGNITO_USER_POOL_ID : string;
  const AWS_COGNITO_CLIENT_ID : string;
}
export {};
» tsconfig.json
{
  "compilerOptions": {
    "include": ["./src/**/*.ts", "./Cognito.d.ts"]
  }
}
Note: In practice, you can include additional configurations for compilerOptions in the `tsconfig.json` file.
Now, you can use these global variables (`AWS_COGNITO_REGION`, `AWS_COGNITO_USER_POOL_ID`, `AWS_COGNITO_CLIENT_ID`) anywhere in your TypeScript code without needing to import them. For example:
» cognito-service.ts
class CognitoUtil {

  public static REGION: string = AWS_COGNITO_REGION;

  public static USER_POOL_ID = AWS_COGNITO_USER_POOL_ID;

  public static CLIENT_ID = AWS_COGNITO_CLIENT_ID;

  public static POOL_DATA = {
    UserPoolId: CognitoUtil.USER_POOL_ID,
    ClientId: CognitoUtil.CLIENT_ID,
  };

  // TODO
}

const CognitoUtilInstance = new CognitoUtil();
export default CognitoUtilInstance;
Usually, when we are working on the front-end of app, we follow principle called Separation of Concerns (SoC). This means we keep things organized by splitting up the Cognito service and the login logic. Both are written in TypeScript. For example:

In the next step, we will discuss how to transfer data from the OSGi service to AEM HTL component and then pass it to the front-end module in the TypeScript layer.
Sometimes, there are some risk of cyber hackers attacking Cognito configurations when they are passed from Sling Model through HTL using data attribute. In reality, when initializing Cognito user pool and SDK client in JavaScript to access them, you need to provide the region, pool ID, and client ID.
However, if you create Cognito user pool under IAM user, you must also provide the AWS access key and AWS secret access key for authentication. Therefore, we have two authentication scenarios or cases.
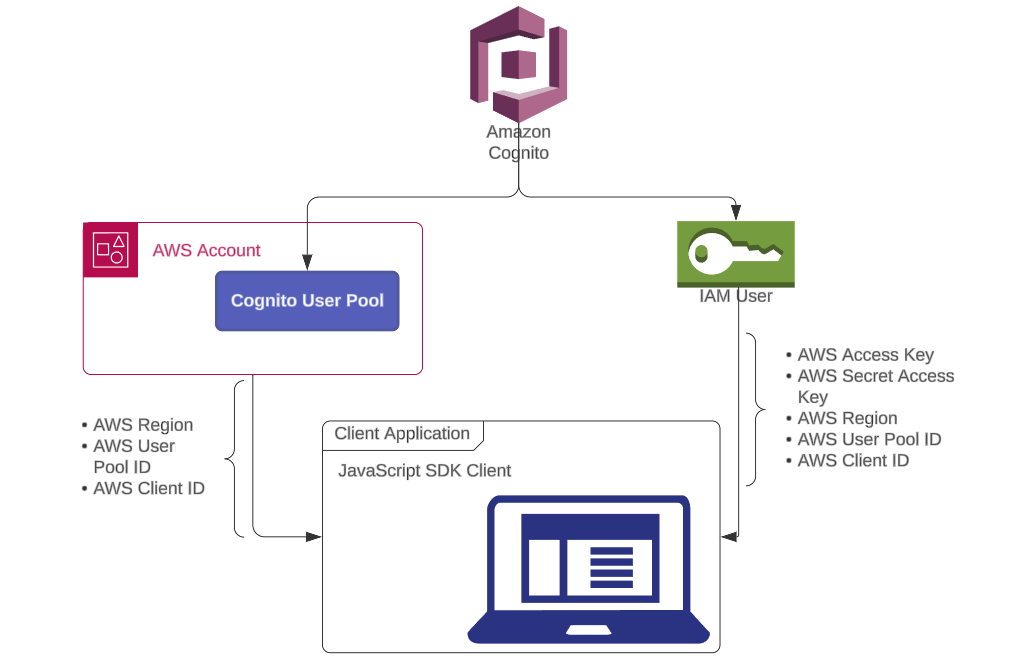
Based on the diagram, if the configuration is compromised, it becomes crucial to enhance the security of incoming requests by leveraging Cognito triggers. Use the Pre-Sign-Up Lambda trigger and implementing appropriate exception handling measures can effectively prevent unauthorized access attempts from external sources.
» flagtickSignupPrePython.py
def lambda_handler(event, context):
    print(event)

    try:
        # Your logic in here
        # Return to Amazon Cognito
        return event

    except Exception as e:
        error_message = str(e)
        print("PreSignUp error:", error_message)
        error_response = {
            "code": "UserLambdaValidationException",
            "name": "UserLambdaValidationException",
            "message": "You do not have permission to perform this action."
        }
        raise Exception(error_response)
With the those analysis as detailed above, we will proceed to modify `cognito-service.ts` as follows.
» cognito-service.ts
class CognitoUtil {

  public static REGION: string = AWS_COGNITO_REGION;

  public static USER_POOL_ID = AWS_COGNITO_USER_POOL_ID;

  public static CLIENT_ID = AWS_COGNITO_CLIENT_ID;

  public static POOL_DATA = {
    UserPoolId: CognitoUtil.USER_POOL_ID,
    ClientId: CognitoUtil.CLIENT_ID,
  };

  refreshCognitoConfig = (): void => {
    CognitoUtil.REGION = cookieUtils.getCookie(REGION) !== '' ? atob(cookieUtils.getCookie(REGION)) : AWS_COGNITO_REGION;
    CognitoUtil.USER_POOL_ID = cookieUtils.getCookie(POOL_ID) !== '' ? atob(cookieUtils.getCookie(POOL_ID)) : AWS_COGNITO_USER_POOL_ID;
    CognitoUtil.CLIENT_ID = cookieUtils.getCookie(CLIENT_ID) !== '' ? atob(cookieUtils.getCookie(CLIENT_ID)) : AWS_COGNITO_CLIENT_ID;
    CognitoUtil.POOL_DATA = {
      UserPoolId: CognitoUtil.USER_POOL_ID,
      ClientId: CognitoUtil.CLIENT_ID,
    };
  };
}

const CognitoUtilInstance = new CognitoUtil();
export default CognitoUtilInstance;
Note: In the provided TypeScript class, Cognito configuration parameters are retrieved from cookies. The refreshCognitoConfig method is then used to dynamically update these parameters if new values are detected in the cookies. This ensures that any changes made to the Cognito configuration via cookies are promptly reflected within the `cognito-service.ts` class without requiring manual manipulation.
V. Use Adobe I/O CLI for Cloud Manager
The Adobe I/O CLI plugin, akin to the AWS CLI tool, offers a customizable command-line interface crafted by Adobe. It empowers developers to integrate tailored commands and plugins into their workflow. Please visit https://www.npmjs.com/package/@adobe/aio-cli to install the @adobe/aio-cli package using NPM (Node Package Manager).
aio app
aio app add
aio app add action
aio app add actions
aio app add ci
aio app add event
aio app add events
aio app add ext
...
Conduct to verify the installed version of Adobe I/O CLI by running `aio -v`, `aio --version`, or `aio version`.
aio -v
Next, install the plugin named `@adobe/aio-cli-plugin-cloudmanager`, which enhances the functionality of the Adobe I/O CLI.
aio plugins:install @adobe/aio-cli-plugin-cloudmanager
Refer to the article here for the necessary steps to set up authentication for Adobe I/O CLI. After successfully authenticating, proceed to select your organization in the Adobe Cloud.
aio cloudmanager:org:select
Note: You can use `aio config list` to determine which program ID, environment ID, and organization ID the current configuration settings in the Adobe I/O CLI will point to.
Conduct to list all pipelines or environments configured in the Adobe Cloud with your organization, typically execute the following command:
aio cloudmanager:program:list-pipelines
or aio cloudmanager:program:list-environments
By use the environment ID, you can load all variables set within the environment.
aio cloudmanager:environment:list-variables <environment id>
Manage the creation or removal of environment variables in Adobe Cloud using the following commands:
aio cloudmanager:set-environment-variables <environment id> --variable VAR_1 "<value 1>" --secret VAR_2 "<value 2>"
Sometimes, you may need to delete one or more environment variables if they have been improperly configured.
aio cloudmanager:set-environment-variables <environment id> --delete VAR_1 VAR_2
VI. Conclusion
Setting up environment variables in Adobe Experience Manager (AEM) is crucial for ensuring smooth and secure deployment of applications. By properly configuring these variables, developers can synchronize configuration from the cloud to the AEM Front-end application and avoid copying configuration between environments during Adobe's regular maintenance updates.
If you face any difficulties or have questions while setting up environment variables in AEM, feel free to leave a comment. Your feedback is valuable, and our community is here to help address any roadblocks you encounter.
VII. Video