Nowadays, using Email was gradually becoming a current trend by far the previous ways. Especially, verify a new user if they register an account with a specific email. It aims to avoid fake emails or robots that carry out doing it instead of humans. On the other hand, in a campaign of serving customers, some brands need to Email Marketing to advertise their products, remind customers about their activities in the system, and get feedback from clients.
The article provides guidance about the configuration of sending Email in the Laravel project and mention extra concepts of using Queues in Laravel Mail.
I. Setup Queue Send Mail in Laravel Project
The operation of sending Email pose a lot challenges of performance of the Website. That means the process usually lost a little bit of time for waiting for a response successful or a failure.
That means the process usually lost a little bit of time for waiting for a response successful or a failure. So that, in these cases, some of the alternative solutions using Queue to manage effectively sending Email in other thread compared to the main thread of the program.
The contemporary, queue also helps to manage time to carry out sending Emails or schedule it by specific date or time by using Cron-Job.
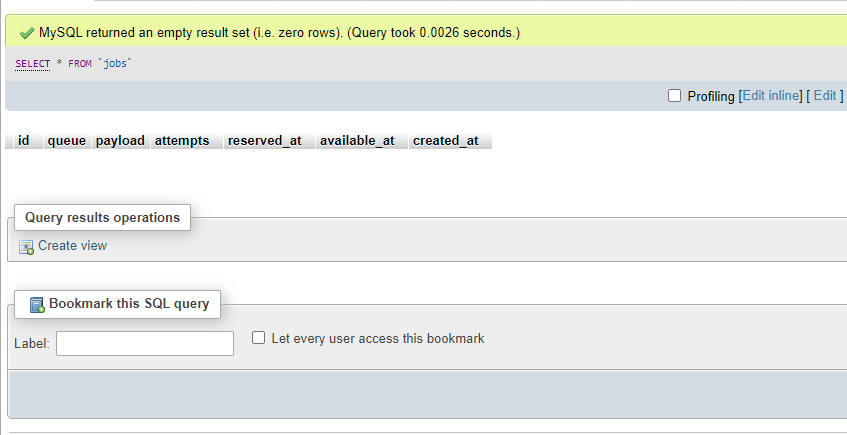
- Carry out creating queue table in MySQL database with artisan command.
php artisan queue:table
The result of the syntax above creating migration file named 2021_05_30_021915_create_jobs_table.php in migrations folder.
<?php

use Illuminate\Support\Facades\Schema;
use Illuminate\Database\Schema\Blueprint;
use Illuminate\Database\Migrations\Migration;

class CreateJobsTable extends Migration
{
    /**
     * Run the migrations.
     *
     * @return void
     */
    public function up()
    {
        Schema::create('jobs', function (Blueprint $table) {
            $table->bigIncrements('id');
            $table->string('queue')->index();
            $table->longText('payload');
            $table->unsignedTinyInteger('attempts');
            $table->unsignedInteger('reserved_at')->nullable();
            $table->unsignedInteger('available_at');
            $table->unsignedInteger('created_at');
        });
    }

    /**
     * Reverse the migrations.
     *
     * @return void
     */
    public function down()
    {
        Schema::dropIfExists('jobs');
    }
}
The conventional view, when every people create a database with all designed tables before, using manipulations from the User Interface of phpmyadmin to manipulate. Besides that way, execute the artisan command below and associate it with the migration file also help create a table quickly and allow make a full of adjustment.
php artisan migrate
or
php artisan migrate:refresh --path=/database/migrations/2021_05_30_021915_create_jobs_table.php
The table jobs will be generated automatically in PHPMyAdmin.
To see a list of all the artisan commands, please type run the command php artisan.
D:\Project\flagtick>php artisan
  make:auth                     Scaffold basic login and registration views and routes
  make:bindings                 Add repository bindings to service provider.
  make:channel                  Create a new channel class
  make:command                  Create a new Artisan command
  make:controller               Create a new controller class
  make:criteria                 Create a new criteria.
  make:entity                   Create a new entity.
  make:event                    Create a new event class
  make:exception                Create a new custom exception class
  make:factory                  Create a new model factory
  make:job                      Create a new job class
  make:listener                 Create a new event listener class
  make:mail                     Create a new email class
- Be assumption that needs a job to send Emails in Laravel and manage by queue is commonly called SendEmailVerified.php.
php artisan make:job SendEmailVerified
II. Activate New User through Laravel Mail
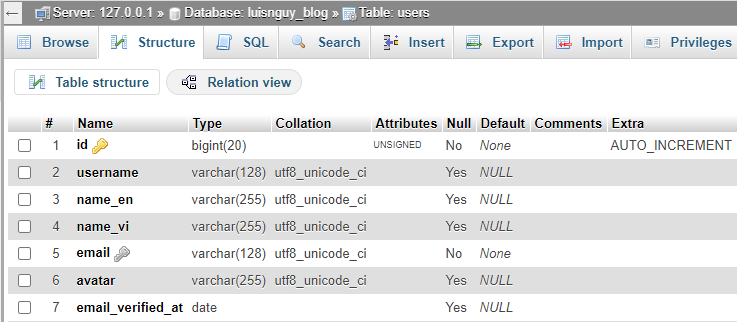
There are many ways to check a new account to avoid the virtual registration or behavior of crackers or robots. Make adjustment columns in table users which update new field named "email_verified_at" which type of value is date or timestamp. On the other hand, some of the other ways conduct to create a field named "is_activated" which type of value is tinyint(in SQL language).
- Add field email_verified_at to table users.
- Create a table named verifications for storing verify tokens by executing the content of the migration file below.
<?php

use Illuminate\Support\Facades\Schema;
use Illuminate\Database\Schema\Blueprint;
use Illuminate\Database\Migrations\Migration;

class CreateVerificationsTable extends Migration
{
    /**
     * Schema table name to migrate
     * @var string
     */
    public $tableName = 'verifications';

    /**
     * Run the migrations.
     *
     * @return void
     */
    public function up()
    {
        if (!Schema::hasTable($this->tableName))
            Schema::create($this->tableName, function (Blueprint $table) {
                $table->increments('id');
                $table->unsignedBigInteger('user_id');
                $table->string('token', 255)->nullable();
                $table->foreign('user_id')
                    ->references('id')->on('users');

                $table->timestamps();
            });
    }

    /**
     * Reverse the migrations.
     *
     * @return void
     */
    public function down()
    {
        //return true;
        Schema::dropIfExists('verifications');
    }
}
- To correct interpretation about the process, let observe the diagram below.
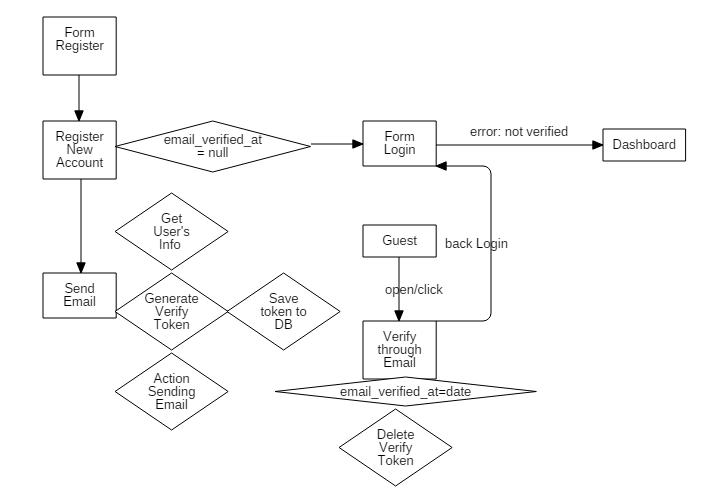
Focus attention on email_verified_at that realizes does Guest have verified or not? It converts from null to date (indicate the specified time for verification).
Based on checking the value null or not null of the attribute to know exactly user logged in or not.
- Conduct to request sending Email as soon as registering a new account.
SendEmailVerified::dispatch($data)->delay(now()->addMinutes(1));
The command declares using job SendEmailVerified above and associates the function delay to perform action sending Email after one minute.
$data is known as an object that contains essential parameters of the new user to serve to send Email.
$data = [
'id' => $user[0]['id'],
'email' => $user[0]['email'],
'name' => $name,
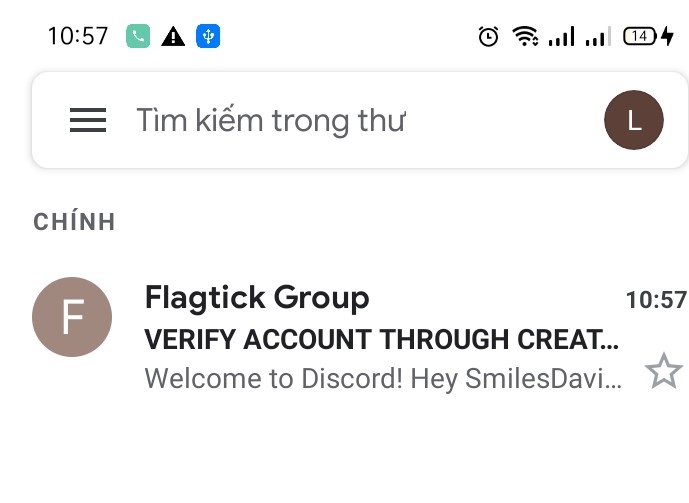
'subject' => 'VERIFY ACCOUNT THROUGH CREATING A NEW ACCOUNT'
];
Those parameters completely expand extra if a verified email needs it.
+ id: That is exactly user_id and associate it together with a verified token to storage all in table verification. It's convenient to make a query for a through the user.
Actually, $user[0]['id'] is an example way to query to get user_id. So that, manipulation saving user mush handle before sending Email.
But later, those guests already didn't verify and use available data in table verification to query user_id and conduct delete faked record in table user.
+ email: Known as a routing address of guest and seek to send Email.
+ name: Provide a variable that contains the name of the guest and embeds it into an Email template.
For example, Dear <>, in syntax <>, assign the variable name to it.
+ subject: Describe title of Email or subject title Email.
The result from sending Emails is successfully below.
- Establish logic to send Emails in SendEmailVerified.php. In method handle() that divide apparently into three steps:
+ Generate verified token by using md5.
$token = md5($name).md5($name).md5($name);
+ Save user_id and associate with verified token above in table verification.
Verification::create([
    'user_id' => $this->data['id'],
    'token' => $token,
    'created_at' => $this->freshTimestamp(),
    'updated_at' => $this->freshTimestamp()
]);
+ Make an action by sending an Email via guest's Email or registered Email from registration.
<?php

namespace App\Jobs;

use App\Model\Verification;
use Illuminate\Bus\Queueable;
use Illuminate\Database\Eloquent\Concerns\HasTimestamps;
use Illuminate\Queue\SerializesModels;
use Illuminate\Support\Facades\Mail;
use Illuminate\Queue\InteractsWithQueue;
use Illuminate\Contracts\Queue\ShouldQueue;
use Illuminate\Foundation\Bus\Dispatchable;

class SendEmailVerified implements ShouldQueue
{
    use Dispatchable, InteractsWithQueue, Queueable, SerializesModels, HasTimestamps;

    protected $data;
    /**
     * Create a new job instance.
     *
     * @return void
     */
    public function __construct($data)
    {
        $this->data = $data;
    }

    /**
     * Execute the job.
     *
     * @return void
     */
    public function handle()
    {
        $email = $this->data['email'];
        $name = $this->data['name'];
        $subject = $this->data['subject'];
        $token = md5($name).md5($name).md5($name);

        Verification::create([
            'user_id' => $this->data['id'],
            'token' => $token,
            'created_at' => $this->freshTimestamp(),
            'updated_at' => $this->freshTimestamp()
        ]);

        Mail::send('auth.verify',
            [
                'name' => $name,
                'token' => $token
            ], function ($mail) use ($email, $name, $subject) {
                $mail->to($email, $name)->subject($subject);
                $mail->from(env('MAIL_USERNAME'), 'Flagtick Group');
            });
    }
}
III. Configure SMTP in File .ENV
To become apparent, the section will divide into two small cases such as Gmail SMTP Server and cPanel Server.
- Gmail SMTP Server
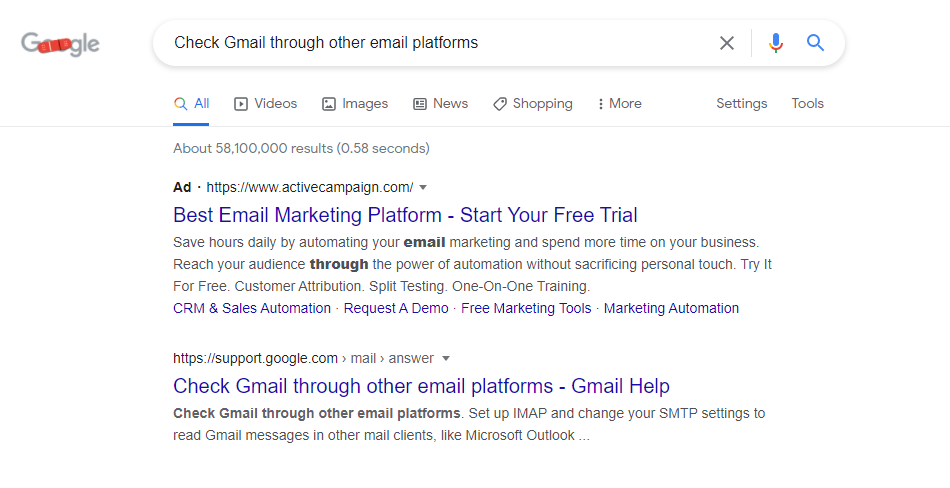
Firstly, check mail through Google Gmail or other email platforms deem necessary to how is setting SMTP and parameters to establish in client-side.
Be assumption that using [email protected] is hosted mail server, carry out of logging into Gmail and navigate to section Forwarding and POP/IMAP to enable IMAP.
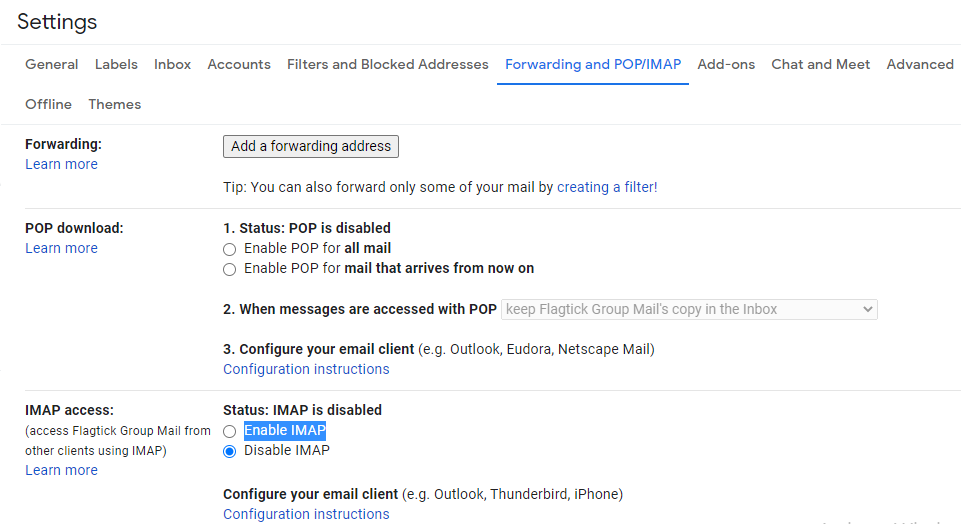
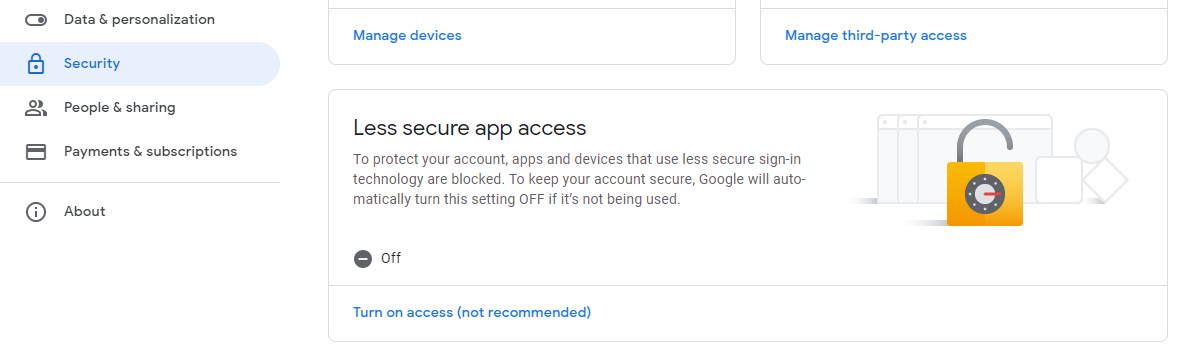
If use POP or IMAP then lets enable it to ensure that third-party mails client works properly or enable "Less secure apps" following the path "Manage your Google Account" > "Security" > "Less secure app access".
From the link Google document here, there is some configuration for applying to the Laravel project.
- Gmail IMAP Server: Server: imap.gmail.com, Encryption/Authentication: SSL, Port: 993.
- Gmail POP3 Server: Server: pop.gmail.com, Encryption/Authentication: SSL, Port: 995.
- Gmail SMTP Server: Server: smtp.gmail.com, Encryption/Authentication: SSL, Port: 465 or Server: smtp.gmail.com, Encryption/Authentication: TLS, Port: 587.
Select carefully those configurations above and then assemble the setting in .env looks like this.
MAIL_MAILER=smtp
MAIL_HOST=smtp.gmail.com
MAIL_PORT=587
[email protected]
MAIL_PASSWORD=Abc@123456
MAIL_ENCRYPTION=tls
[email protected]
MAIL_FROM_NAME=Flagtick
- cPanel Server
Cpanel server is now gradually popular for developing and launching some websites written based on languages like PHP, JS, Ruby, Python,... The main section focuses on the aspect of Email configuration from the client-side and not going to explain the full of things in Cpanel. The topic associating with Cpanel can mention another article if necessarily needed. So that let's open up it and type the keyword "Email or Email Account" in the search box.
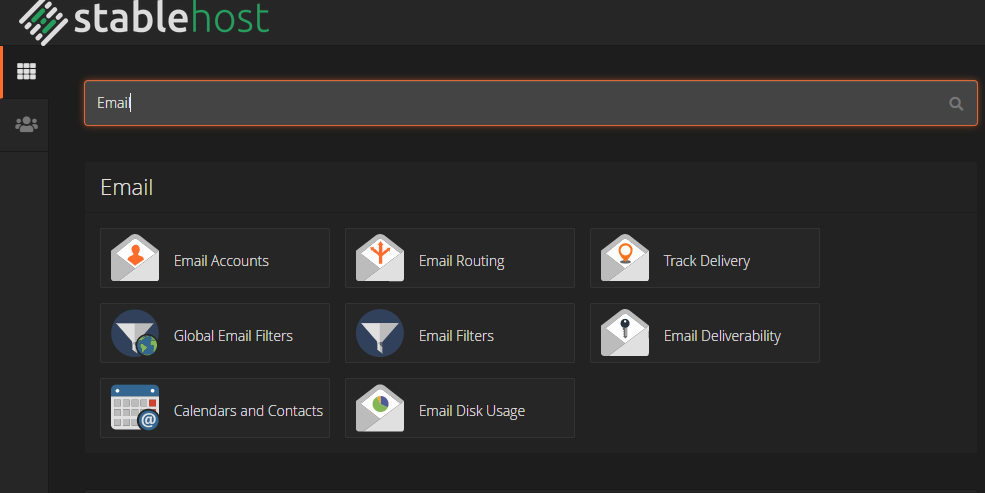
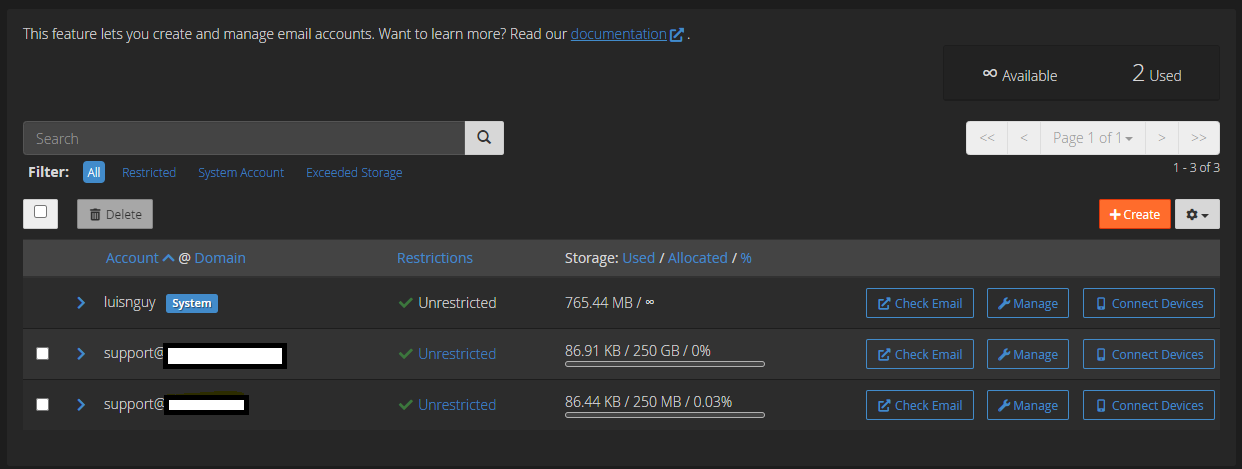
In several cases, the assumption that has a domain as flagtick.com, then establish some mails under format for Email marketing or Email support: [email protected] or [email protected].
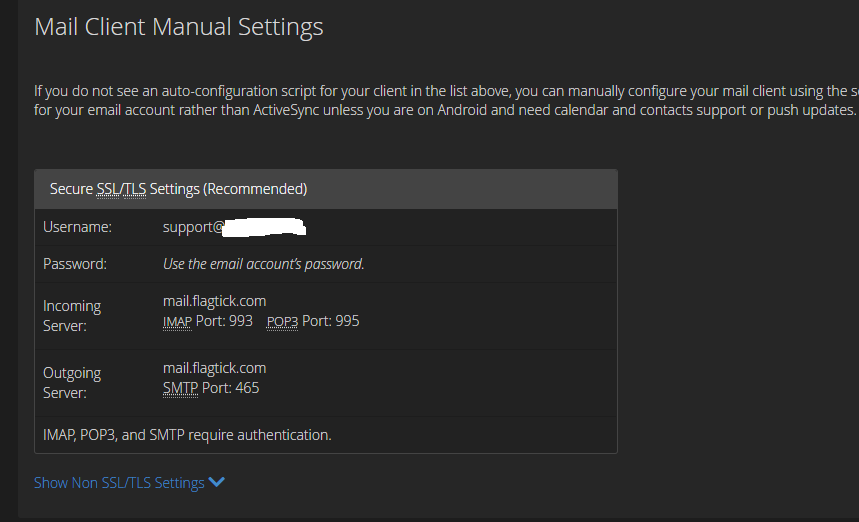
Click to Connect Devices to get the configuration. Look at the Outgoing mail.flagtick.com and port for SMTP mode 465.
Apply for the file .env with the configuration above. Some manipulations are rapidly easier to perform compared with Gmail SMTP Server.
MAIL_MAILER=smtp
MAIL_HOST=mail.flagtick.com
MAIL_PORT=465
[email protected]
MAIL_PASSWORD=Abc@123456
MAIL_ENCRYPTION=ssl
[email protected]
MAIL_FROM_NAME=Flagtick
IV. Conclusion
The article mainly presented how to configure Sending email in the Laravel project with two types Gmail SMTP Server and Cpanel SMTP Server. Provide further knowledge associating to queue to manage manipulation of sending Email. If you encounter any problem while referring to my post, please leave a comment below to support you.
V. Video