One of the most essential concepts in web applications is CRUD (Create, Read, Update, Delete). This concept allows developers to interact with the database by using queries to retrieve, create, update, and delete records. In the context of the Spring Boot framework, Spring Data JPA is a design pattern that simplifies the implementation of CRUD functionality.
Spring Data JPA involves creating a repository interface for each entity in the application. These interfaces are responsible for handling all database interactions related to their respective entities, such as creating, reading, updating, and deleting records.
In this article, we will explore how Spring Data JPA is implemented in the Spring Boot framework and how it can expedite the support of CRUD functionality. We will cover the following topics:
• Setup Spring Boot Project
• Connect MySQL Database
• JpaRepository in Spring Boot
• Get/Update and Delete User
Before we start exploring the code implementation, it's essential to go through the installation process of Spring Data JPA, the Spring boot framework, and how to configure them initially.
I. Setup Spring Boot Project
To create a Spring Boot application with JPA support, you should use a specific archetype provided by the Spring Boot framework that includes all the essential dependencies needed for such an application. For instance, consider the following two scripts which are used to generate a Java project and a Spring Boot project, respectively.
» Java Project
mvn archetype:generate -DgroupId=com.flagtick -DartifactId=springbootjpa -DarchetypeArtifactId=maven-archetype-quickstart -DinteractiveMode=false -DarchetypeVersion=1.4
» Spring Boot Project
mvn archetype:generate -Dfilter=spring-boot
After executing the script, a list of available Maven archetypes will be displayed:
62: remote -> org.kie:kie-service-spring-boot-archetype (-)
63: remote -> org.kie.kogito:kogito-spring-boot-archetype (Kogito based on Spring Boot runtime Archetype)
64: remote -> org.springframework.boot:spring-boot-sample-actuator-archetype (Spring Boot Actuator Sample)
65: remote -> org.springframework.boot:spring-boot-sample-actuator-log4j-archetype (Spring Boot Actuator Log4J Sample)
66: remote -> org.springframework.boot:spring-boot-sample-actuator-noweb-archetype (Spring Boot Actuator Non-Web Sample)
67: remote -> org.springframework.boot:spring-boot-sample-actuator-ui-archetype (Spring Boot Actuator UI Sample)
68: remote -> org.springframework.boot:spring-boot-sample-amqp-archetype (Spring Boot AMQP Sample)
69: remote -> org.springframework.boot:spring-boot-sample-aop-archetype (Spring Boot AOP Sample)
70: remote -> org.springframework.boot:spring-boot-sample-batch-archetype (Spring Boot Batch Sample)
71: remote -> org.springframework.boot:spring-boot-sample-data-jpa-archetype (Spring Boot Data JPA Sample)
72: remote -> org.springframework.boot:spring-boot-sample-data-mongodb-archetype (Spring Boot Data MongoDB Sample)
73: remote -> org.springframework.boot:spring-boot-sample-data-redis-archetype (Spring Boot Data Redis Sample)
74: remote -> org.springframework.boot:spring-boot-sample-data-rest-archetype (Spring Boot Data REST Sample)
75: remote -> org.springframework.boot:spring-boot-sample-integration-archetype (Spring Boot Integration Sample)
76: remote -> org.springframework.boot:spring-boot-sample-jetty-archetype (Spring Boot Jetty Sample)
77: remote -> org.springframework.boot:spring-boot-sample-profile-archetype (Spring Boot Profile Sample)
78: remote -> org.springframework.boot:spring-boot-sample-secure-archetype (Spring Boot Security Sample)
79: remote -> org.springframework.boot:spring-boot-sample-servlet-archetype (Spring Boot Servlet Sample)
80: remote -> org.springframework.boot:spring-boot-sample-simple-archetype (Spring Boot Simple Sample)
Select option 71 from the list and confirm the groupId and artifactId values when prompted during executing the script.
groupId: com.flagtick
artifactId: springboojpa
version: 1.0
On the other hand, you may also use the Spring Initializr web interface, available at https://start.spring.io, which provides a user-friendly way to create Spring Boot Java projects with the necessary dependencies.
To configure Spring Data JPA and establish a connection to a MySQL database, you will need to add specific dependencies to the `pom.xml` file. For example, you can include the following dependencies in the `pom.xml` file:
<dependency>
  <groupId>mysql</groupId>
  <artifactId>mysql-connector-java</artifactId>
  <version>8.0.32</version>
</dependency>
Note: We understand that the `spring-boot-starter-test` dependency implicitly includes JUnit and other testing-related libraries commonly used in Spring Boot applications. If a version is not specified, Maven will use the latest version available in the repository.
<dependency>
   <groupId>org.springframework.boot</groupId>
   <artifactId>spring-boot-starter-test</artifactId>
   <scope>test</scope>
</dependency>
Hence, issues may arise when using annotations such as @SpringBootTest without specifying the version of the installed `spring-boot-starter-test` dependency.
<dependency>
   <groupId>org.springframework.boot</groupId>
   <artifactId>spring-boot-starter-test</artifactId>
   <version>3.0.5</version>
   <scope>test</scope>
</dependency>
If you're using Java 11, you may need to downgrade the version of the `spring-boot-starter-test` dependency to ensure compatibility with your local machine. This can be important for ensuring that your application runs correctly. Be sure to choose a version that is appropriate for your specific needs and requirements.
<dependency>
	<groupId>org.springframework.boot</groupId>
	<artifactId>spring-boot-starter-test</artifactId>
	<version>2.2.6.RELEASE</version>
	<scope>test</scope>
</dependency>
When you use the `mvn install` command to build and package your project, the resulting artifact is installed in your local Maven repository. You can then reference this
artifact as a dependency in another project's `pom.xml` file.
[INFO] --- maven-jar-plugin:3.0.2:jar (default-jar) @ springbootjpa ---
[INFO] Building jar: C:\Users\admin\Documents\eco\springbootjpa\target\springbootjpa-1.0-SNAPSHOT.jar
[INFO]
[INFO] Installing C:\Users\admin\Documents\eco\springbootjpa\target\springbootjpa-1.0-SNAPSHOT.jar to C:\Users\admin\.m2\repository\com\flagtick\springbootjpa\1.0-SNAPSHOT\springbootjp
[INFO] Installing C:\Users\admin\Documents\eco\springbootjpa\pom.xml to C:\Users\admin\.m2\repository\com\flagtick\springbootjpa\1.0-SNAPSHOT\springbootjpa-1.0-SNAPSHOT.pom
[INFO] ------------------------------------------------------------------------
[INFO] BUILD SUCCESS
[INFO] ------------------------------------------------------------------------
[INFO] Total time:  35.194 s
[INFO] Finished at: 2023-04-15T22:06:13+07:00
[INFO] ------------------------------------------------------------------------
Before moving forward, let us refactor the project folder by removing the subfolders inside `com.flagtick`, and we will keep SampleDataJpaApplication.java class as the default Spring Boot startup file.
server.port=8083
II. Connect MySQL Database
To begin with, we need to create a database named "springbootcrud" in phpMyAdmin. You can create it either through a script or by using the UI. If you are comfortable with scripting, that could be a quicker and more efficient option. Alternatively, you can use the UI to manually create the database. Once the database has been created, we can proceed with the next steps.
CREATE DATABASE springbootcrud;
Firstly, navigate to `src/main/resources` directory and create the `application.properties` file which define properties to configure the connection to your MySQL database
server.port=8083

spring.datasource.url=jdbc:mysql://localhost:3306/springbootcrud?useSSL=false
spring.datasource.username=root
spring.datasource.password=
spring.datasource.driver-class-name=com.mysql.cj.jdbc.Driver

#  Use for communicating with a MySQL database
spring.jpa.properties.hibernate.dialect=org.hibernate.dialect.MySQL5InnoDBDialect

# This is one of behavior of Hibernate and automatically update the database schema based on any
# changes to the entity classes
spring.jpa.hibernate.auto-ddl=update

spring.jpa.show-sql=true
spring.jpa.properties.hibernate.format_sql=true
You can leverage the `SampleDataJpaApplication.java` class in your Spring Boot application to establish a connection to a MySQL database and check configuration.
package com.flagtick;

import org.springframework.boot.autoconfigure.SpringBootApplication;
import org.springframework.jdbc.datasource.DriverManagerDataSource;

import javax.sql.DataSource;

@SpringBootApplication
public class App
{
    public static void main( String[] args )
    {
        // create data source
        DriverManagerDataSource dataSource = new DriverManagerDataSource();
        dataSource.setDriverClassName("com.mysql.cj.jdbc.Driver");
        dataSource.setUrl("jdbc:mysql://localhost:3306/tkeyltdr_blog");
        dataSource.setUsername("root");
        dataSource.setPassword("");

        // get connection
        try {
            DataSource ds = dataSource;
            ds.getConnection();
            System.out.println("Connection successful!");
        } catch (Exception e) {
            System.out.println("Error: " + e.getMessage());
        }
    }
}
Once you have written the necessary code to test your database connection, you can run the `App.main()` method in your Spring Boot application. This will trigger the code you have written, and you will be able to observe any output generated by `System.out.println()` in the console of your IntelliJ IDE.
10:08:42.577 [main] DEBUG org.springframework.jdbc.datasource.DriverManagerDataSource - Loaded JDBC driver: com.mysql.cj.jdbc.Driver
10:08:42.577 [main] DEBUG org.springframework.jdbc.datasource.DriverManagerDataSource - Creating new JDBC DriverManager Connection to [jdbc:mysql://localhost:3306/tkeyltdr_blog]
Connection successful!

Process finished with exit code 0
You can replace `System.out.println()` with Log4j2 to log information, warnings, and errors generated by your Spring Boot application. This will allow you to observe these events and analyze them more effectively.
1. Add the log4j2 dependency to your `pom.xml` file:
<dependency>
  <groupId>org.apache.logging.log4j</groupId>
  <artifactId>log4j-core</artifactId>
  <version>2.17.1</version>
</dependency>
2. Create a log4j2 configuration file named `log4j2.xml` in the `src/main/resources` directory of your project:
<?xml version="1.0" encoding="UTF-8"?>
<Configuration>
    <Appenders>
        <Console name="ConsoleAppender" target="SYSTEM_OUT">
            <PatternLayout pattern="%d{HH:mm:ss.SSS} [%t] %-5level %logger{36} - %msg%n"/>
        </Console>
    </Appenders>
    <Loggers>
        <Root level="info">
            <AppenderRef ref="ConsoleAppender"/>
        </Root>
    </Loggers>
</Configuration>
3. After configuring log4j in your Spring Boot application, you can replace `System.out.println()` statements with logging statements.
@SpringBootApplication
public class App
{

    private static final Logger logger = LogManager.getLogger(App.class);

    public static void main( String[] args )
    {
        // create data source
        DriverManagerDataSource dataSource = new DriverManagerDataSource();
        dataSource.setDriverClassName("com.mysql.cj.jdbc.Driver");
        dataSource.setUrl("jdbc:mysql://localhost:3306/tkeyltdr_blog");
        dataSource.setUsername("root");
        dataSource.setPassword("");

        // get connection
        try {
            DataSource ds = dataSource;
            ds.getConnection();
            logger.info("Connection successful!");
        } catch (Exception e) {
            logger.error("Error: " + e.getMessage());
        }
    }
}
III. JpaRepository in Spring Boot
Entity classes are a fundamental part of the Java Persistence API (JPA), which is a specification for mapping Java objects to relational databases. By using entity classes, you can create a mapping between the fields of a Java object and the columns of a database table, and perform CRUD (Create, Read, Update, Delete) operations on the table using standard JPA APIs.
» User.java
package com.flagtick.entity;

import lombok.*;
import org.hibernate.annotations.CreationTimestamp;
import org.hibernate.annotations.UpdateTimestamp;

import javax.persistence.*;
import java.sql.Date;
import java.time.LocalDateTime;

@Entity
@Table(name = "users")
@Getter
@Setter
@NoArgsConstructor
@AllArgsConstructor
@Builder
@ToString
public class User {

    @Id
    @GeneratedValue(strategy = GenerationType.IDENTITY)
    private Long id;

    private String name;

    @Column(nullable = false)
    private String email;

    private String password;

    private String avatar;

    @CreationTimestamp
    private Date createdAt;

    @UpdateTimestamp
    private Date updatedAt;
}
Note: We want to generate or update the database schema based on the mapping information provided by the application's entity classes. Hence, you need to change `update` to `create` as below:
spring.jpa.hibernate.ddl-auto=create
• Use Lombok annotations to minimize the boilerplate code in your Java classes. Additionally, we can use the following code snippet to detect the version of Hibernate currently in use: System.out.println(org.hibernate.Version.getVersionString()). This will help ensure that we configure all dependencies to be compatible with the detected version of Hibernate.
<dependency>
   <groupId>org.projectlombok</groupId>
   <artifactId>lombok</artifactId>
   <version>1.18.24</version>
   <scope>provided</scope>
</dependency>
<dependency>
   <groupId>org.hibernate</groupId>
   <artifactId>hibernate-core</artifactId>
   <version>5.1.0.Final</version>
</dependency>
<dependency>
   <groupId>org.hibernate</groupId>
   <artifactId>hibernate-entitymanager</artifactId>
   <version>5.1.0.Final</version>
</dependency>
• If you choose to organize your JPA entities and repositories differently than the default configuration, you can use the @EntityScan annotation to specify the package(s) where your entities are located, and the @EnableJpaRepositories annotation to specify the package(s) where your repositories are located.
» JpaConfiguration.java
package com.flagtick;

import org.springframework.boot.orm.jpa.EntityScan;
import org.springframework.context.annotation.Configuration;
import org.springframework.data.jpa.repository.config.EnableJpaRepositories;

@Configuration
@EnableJpaRepositories(basePackages = "com.flagtick.repository")
@EntityScan(basePackages = "com.flagtick.entity")
public class JpaConfiguration {
}
» SampleDataJpaApplication.java
@Configuration
@ComponentScan
@EnableAutoConfiguration
@Import(JpaConfiguration.class)
public class SampleDataJpaApplication {

   public static void main(String[] args) throws Exception {
      SpringApplication.run(SampleDataJpaApplication.class, args);
   }
}
Note: Because of our application using JPA provider that depends on JAXB for serialization/deserialization of entities to/from XML format, then the jaxb-api dependency may be included as a transitive dependency when you add the JPA provider as a dependency in your Spring Boot project.
<dependency>
   <groupId>javax.xml.bind</groupId>
   <artifactId>jaxb-api</artifactId>
   <version>2.3.1</version>
</dependency>
» repository/UserRepository.java
package com.flagtick.repository;

import com.flagtick.entity.User;
import org.springframework.data.jpa.repository.JpaRepository;

public interface UserRepository extends JpaRepository<User, Long> {
}
• Let us try using unit testing - a software testing technique, to test how the UserRepository works. Please reference link https://flagtick.com/snippet/sprint-boot/implement-a-jpa-unit-test-in-spring-boot
» repository/UserRepositoryIntegrationTests.java
package com.flagtick.repository;

import com.flagtick.SampleDataJpaApplication;
import com.flagtick.entity.User;
import org.junit.Test;
import org.junit.runner.RunWith;
import org.springframework.beans.factory.annotation.Autowired;
import org.springframework.boot.test.SpringApplicationConfiguration;
import org.springframework.test.context.junit4.SpringJUnit4ClassRunner;

@RunWith(SpringJUnit4ClassRunner.class)
@SpringApplicationConfiguration(classes = SampleDataJpaApplication.class)
public class UserRepositoryIntegrationTests {

    @Autowired
    UserRepository userRepository;

    @Test
    public void saveUserTest() {
        User user = new User();
        user.setName("Flagtick Group");
        user.setPassword("Abc@123456");
        user.setEmail("[email protected]");
        User savedUser = userRepository.save(user);
        System.out.println(savedUser.toString());
    }
}
Assuming you are using Hibernate 5.1.0.Final, you can add the following dependency to your pom.xml file to include `spring-boot-starter-web`:
<dependency>
   <groupId>org.springframework.boot</groupId>
   <artifactId>spring-boot-starter-web</artifactId>
   <version>2.6.3</version>
</dependency>
» web/UserController.java
package com.flagtick.web;

import com.flagtick.entity.User;
import com.flagtick.repository.UserRepository;
import org.springframework.beans.factory.annotation.Autowired;
import org.springframework.web.bind.annotation.RequestBody;
import org.springframework.web.bind.annotation.RequestMapping;
import org.springframework.web.bind.annotation.RequestMethod;
import org.springframework.web.bind.annotation.RestController;

@RestController
public class UserController {

   @Autowired
   private UserRepository userRepository;

   @RequestMapping(value = "/api/users", method = RequestMethod.POST)
   public User createUser(@RequestBody User user) {
      System.out.println(user.toString());
      return userRepository.save(user);
   }
}
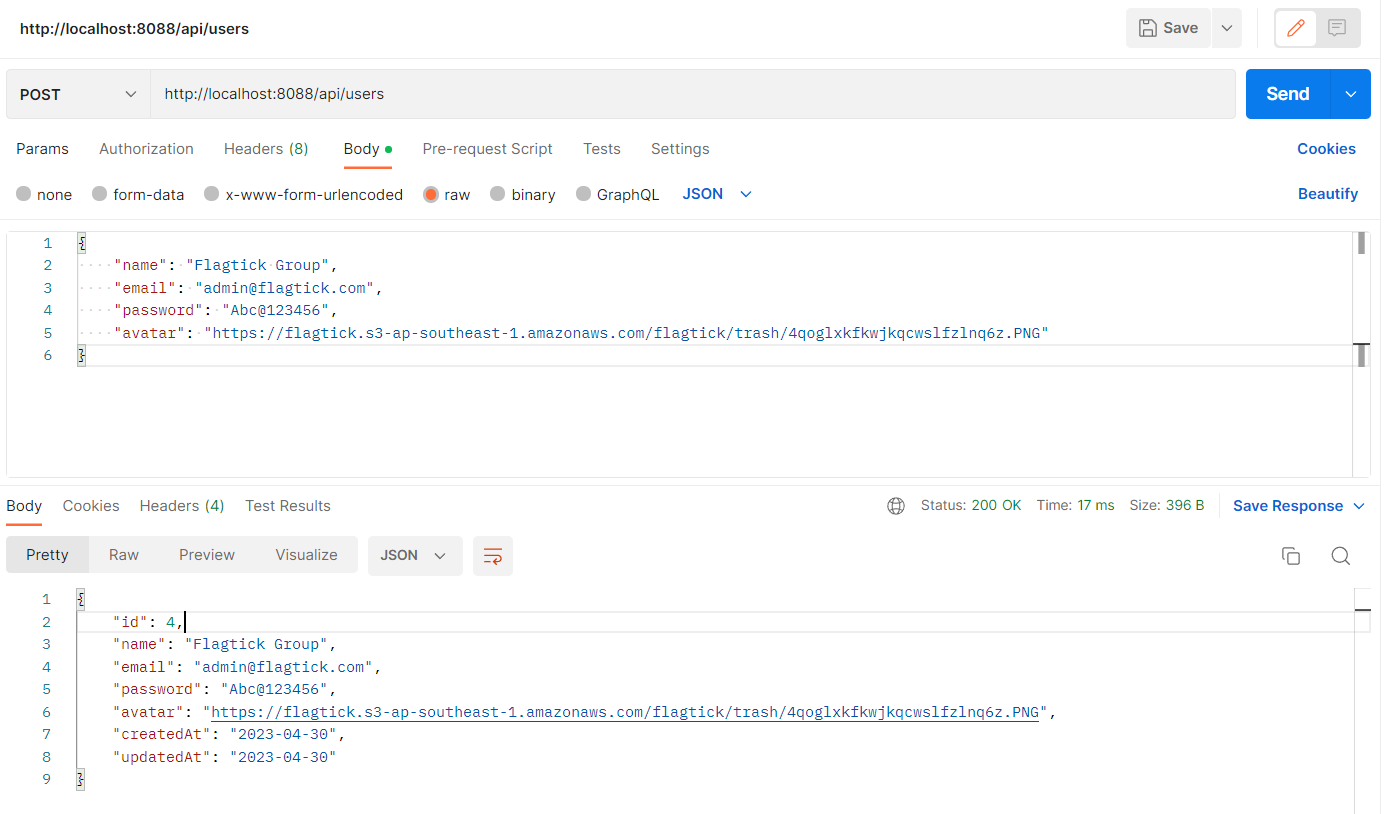
To save a user using a POST request in a Spring Boot application, you can use Postman. First, you need to use the proper endpoint by adding the @PostMapping annotation to the REST controller. Then, use Postman to make a POST request to the endpoint with the user information as the request body. Once the request is sent, the user will be saved in the database.
IV. Get/Update and Delete User
Once you have successfully created the users table, you can update the spring.jpa.hibernate.ddl-auto property in the application.properties file from create to update. Then, you will create Unit test to update user as below:
• Update User
» repository/UserRepositoryIntegrationTests.java
@Test
public void updateUserTest() {
    User user = userRepository.findOne(1L);
    if(user != null) {
        user.setName("Vuong Nguyen");
        userRepository.save(user);
    }
}
» web/UserController.java
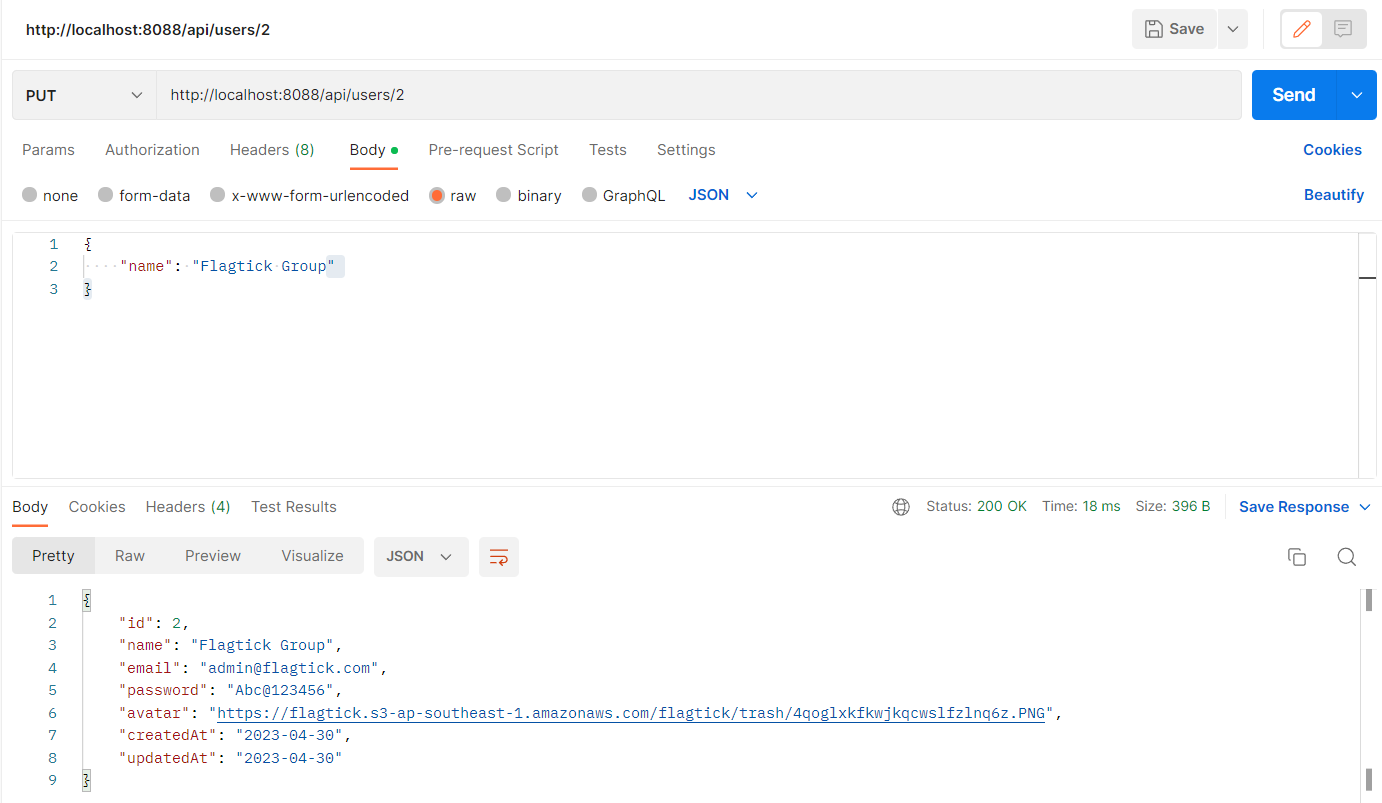
@RequestMapping(value = "/api/users/{userId}", method = RequestMethod.PUT)
public User updateUser(@PathVariable("userId") Long userId, @RequestBody User user) {
   User existedUser = userRepository.findOne(userId);
   if(existedUser != null) {
      existedUser.setName(user.getName());
      userRepository.save(existedUser);
   }
   return existedUser;
}
We can includes status codes in the response. Here is an example:
@RequestMapping(value = "/api/users/{userId}", method = RequestMethod.PUT)
public ResponseEntity<User> updateUser(@PathVariable("userId") Long userId, @RequestBody User user) {
   User existedUser = userRepository.findOne(userId);
   if(existedUser != null) {
      existedUser.setName(user.getName());
      userRepository.save(existedUser);
      return new ResponseEntity<>(existedUser, HttpStatus.OK);
   }
   return new ResponseEntity<>(HttpStatus.NOT_FOUND);
}
• Delete User
» repository/UserRepositoryIntegrationTests.java
@Test
public void deleteUserTest() {
    User user = userRepository.findOne(1L);
    if (user != null) {
        userRepository.delete(1L);
    }
}
» web/UserController.java
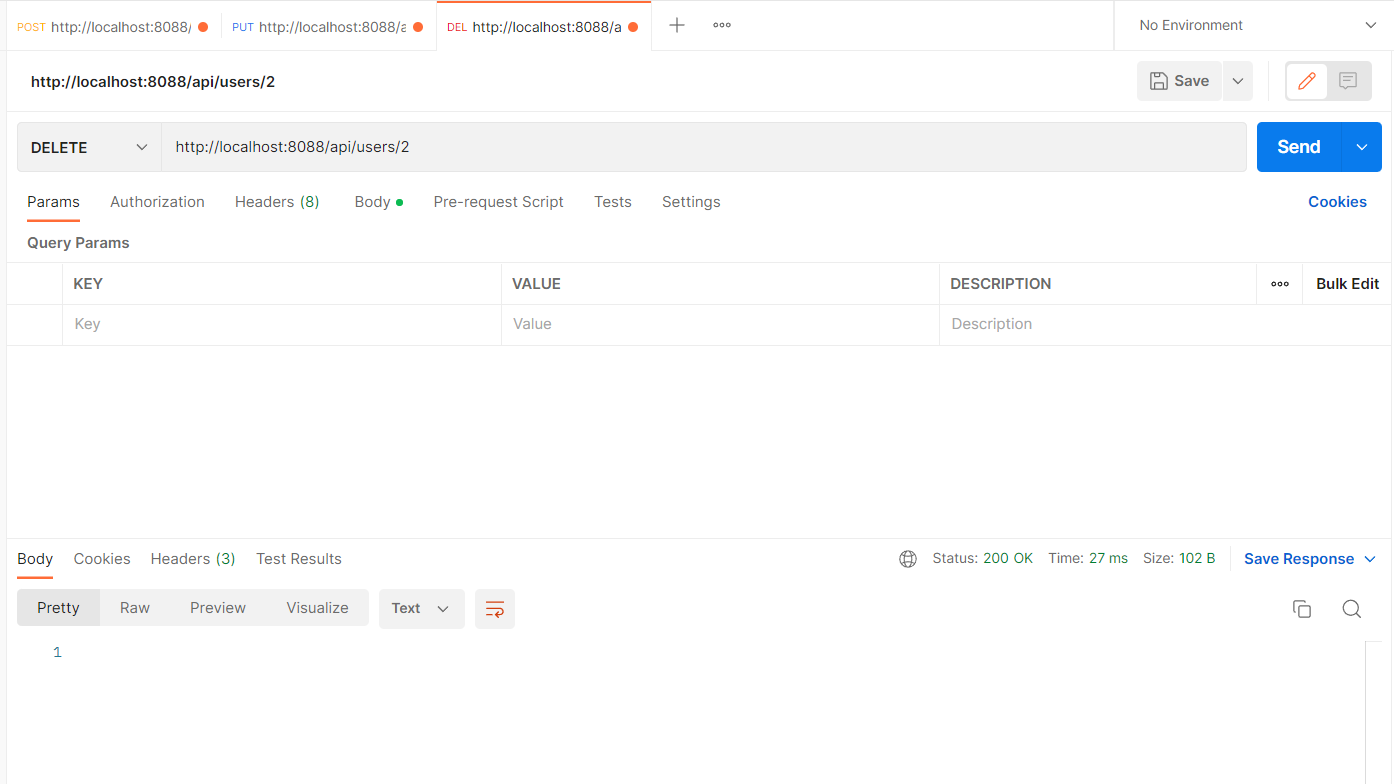
@RequestMapping(value = "/api/users/{userId}", method = RequestMethod.DELETE)
public ResponseEntity<Void> deleteUser(@PathVariable("userId") Long userId) {
   User existedUser = userRepository.findOne(userId);
   if (null != existedUser) {
      userRepository.delete(userId);
      return new ResponseEntity<>(HttpStatus.OK);
   }
   return new ResponseEntity<>(HttpStatus.INTERNAL_SERVER_ERROR);
}
• Get Users
» repository/UserRepositoryIntegrationTests.java
@Test
public void getAllUsers() {
    List<User> users = userRepository.findAll();
    System.out.println(users);
}
When we encounter issues with the output of `System.out.println()` and need a more effective way to display data, we can convert an array of users to a JSON array of users. This allows for a more readable and analyzable format of the data.
@Test
public void getAllUsers() {
    List<User> users = userRepository.findAll();
    ObjectMapper mapper = new ObjectMapper();
    try {
        String json = mapper.writeValueAsString(users);
        System.out.println(json);
    } catch (JsonProcessingException e) {
        e.printStackTrace();
    }
}
» web/UserController.java
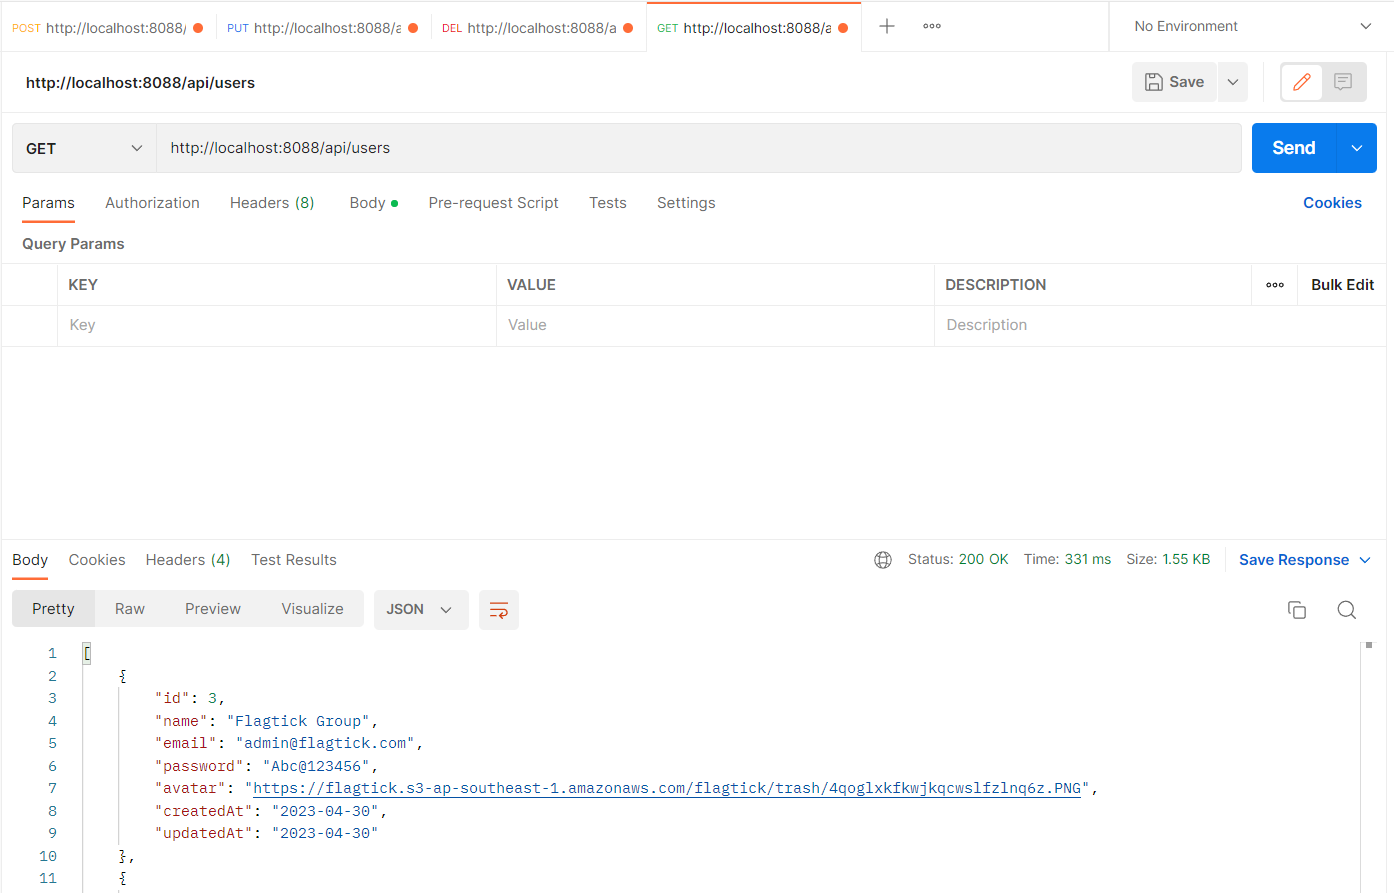
@RequestMapping(value = "/api/users", method = RequestMethod.GET)
public ResponseEntity<String> getAllUsers() {
   List<User> users = userRepository.findAll();
   ObjectMapper mapper = new ObjectMapper();
   try {
      String json = mapper.writeValueAsString(users);
      return new ResponseEntity<>(json, HttpStatus.OK);
   } catch (JsonProcessingException e) {
      return new ResponseEntity<>(e.getMessage(), HttpStatus.INTERNAL_SERVER_ERROR);
   }
}
Moving to Postman, you can observe the result as below:
Beside, Using `curl` - command-line tool that can be used to interact with REST APIs by sending HTTP requests and receiving responses.
curl --verbose http://localhost:8088/api/users
V. Conclusion
The article mainly presented how to create a complete Spring Boot CRUD application. Describe how to use JpaRepository - Repository Design pattern, Lombok, and Rest APIs. If you encounter any problem while referring to our post, please leave a comment below to support you.
VI. Video