Adobe Experience Manager (AEM) is a comprehensive digital experience platform designed to help businesses create, manage, and optimize digital experiences across various channels. As a part of Adobe's Marketing Cloud, AEM integrates seamlessly with other Adobe tools, making it a powerful platform for delivering personalized and engaging content.
I. Download and Install local AEM Instances
There are two valid licenses for legally using AEM, even for local installations: AEM On-Premise and AEM Cloud. Depending on your development and testing purposes, Adobe provides options to run AEM locally using the Quickstart JAR file or by using trial versions.
AEM On-Premise
- AEM on-premise provides more control over the entire infrastructure and allows for extensive customization. Organizations can tailor the environment to their specific needs.[Control and Customization]
- Some organizations, particularly those in highly regulated industries, may have strict data security requirements that make on-premise deployments more appealing. They have full control over data storage and management.[Data Security]
- On-premise deployments often have a different licensing model than cloud services. Licensing costs can vary based on the number of servers, users, and features required.[Licensing]
- On-premise AEM can be integrated with other on-premise systems and databases within an organization's data center.[Integration]
- Initial costs for hardware, infrastructure, and setup can be high. Organizations must manage and maintain their hardware, which may require dedicated IT resources.[Upfront Costs]
AEM Cloud
- AEM as a Cloud offers scalability and flexibility. Organizations can easily scale resources up or down based on demand. Adobe manages the underlying infrastructure, ensuring high availability and performance.[Scalability]
- Adobe handles server maintenance, security updates, and other infrastructure-related tasks, reducing the operational burden on organizations.[Managed Service]
- AEM as a Cloud can reduce the time required for initial setup, allowing organizations to get started with their web projects more quickly.[Faster Time to Market]
- AEM as a Cloud typically follows a subscription-based pricing model, which can help with cost predictability. Licensing may be more flexible, and organizations pay based on usage.[Subscription Model]
- Cloud deployments are often distributed across multiple data centers worldwide, ensuring low-latency access for global audiences.[Global Delivery]
- Adobe provides robust security measures and compliance certifications. Data protection and compliance are central to cloud services.[Security and Compliance]
Since the account is associated with an Adobe organization as a client, AEM Cloud can be used. To download essential resources, navigate to the Software Distribution section within Adobe's portal.
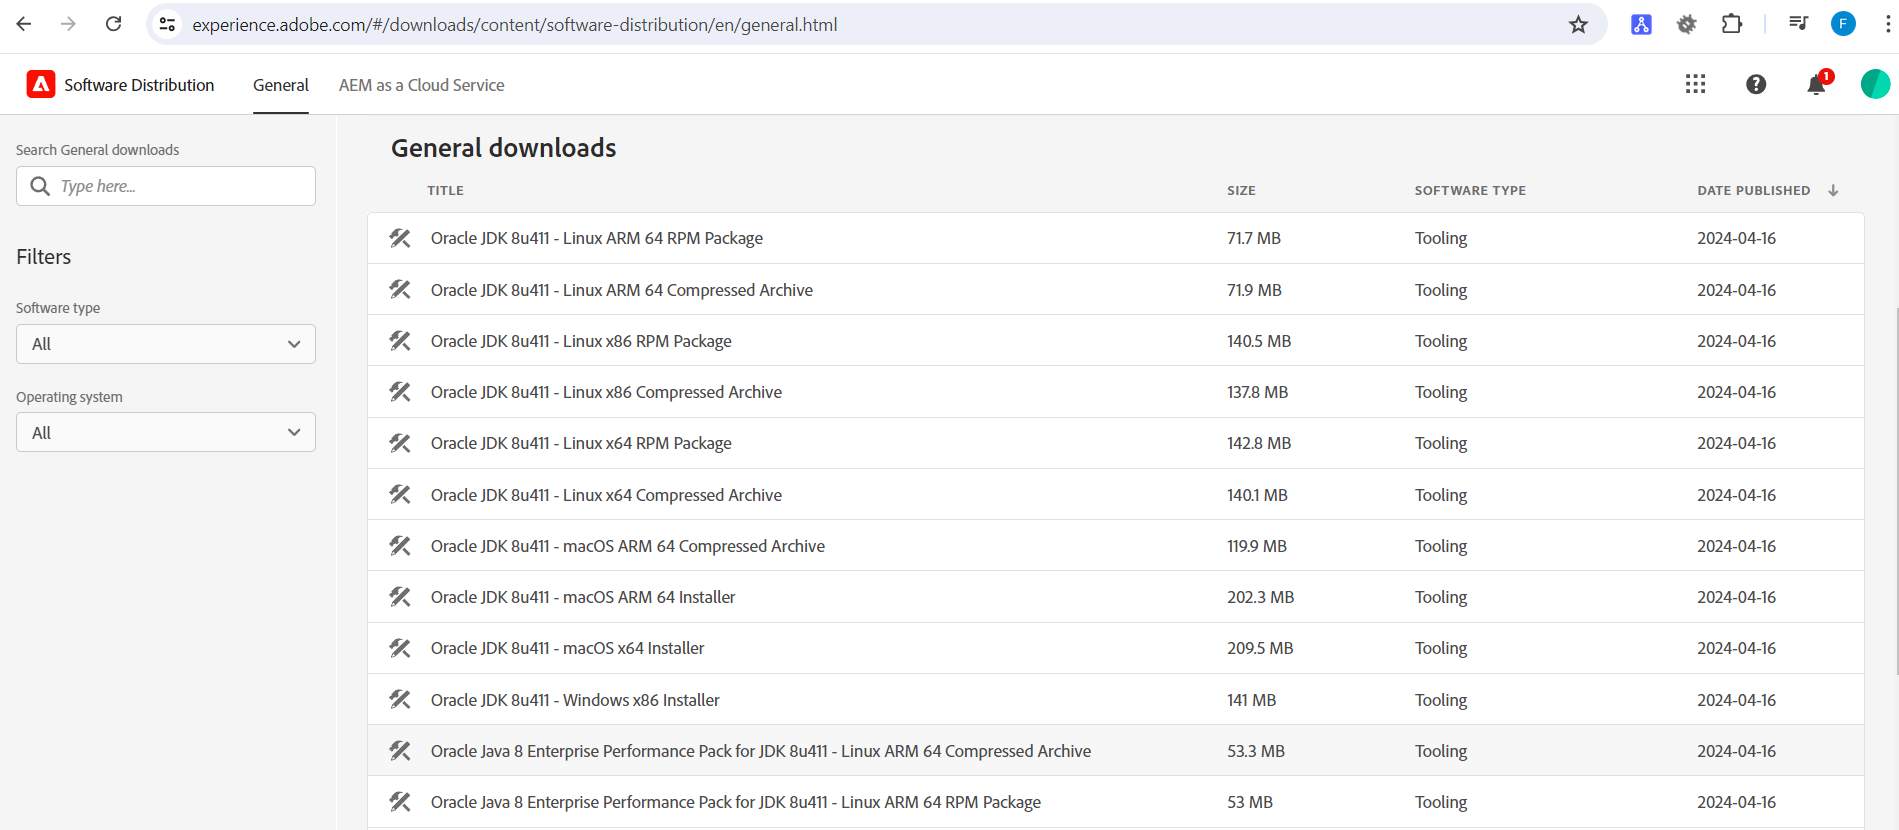
Navigate to AEM as a Cloud Service, and select the item with the prefix `AEM SDK` under the `Tooling` software type to proceed with the download.
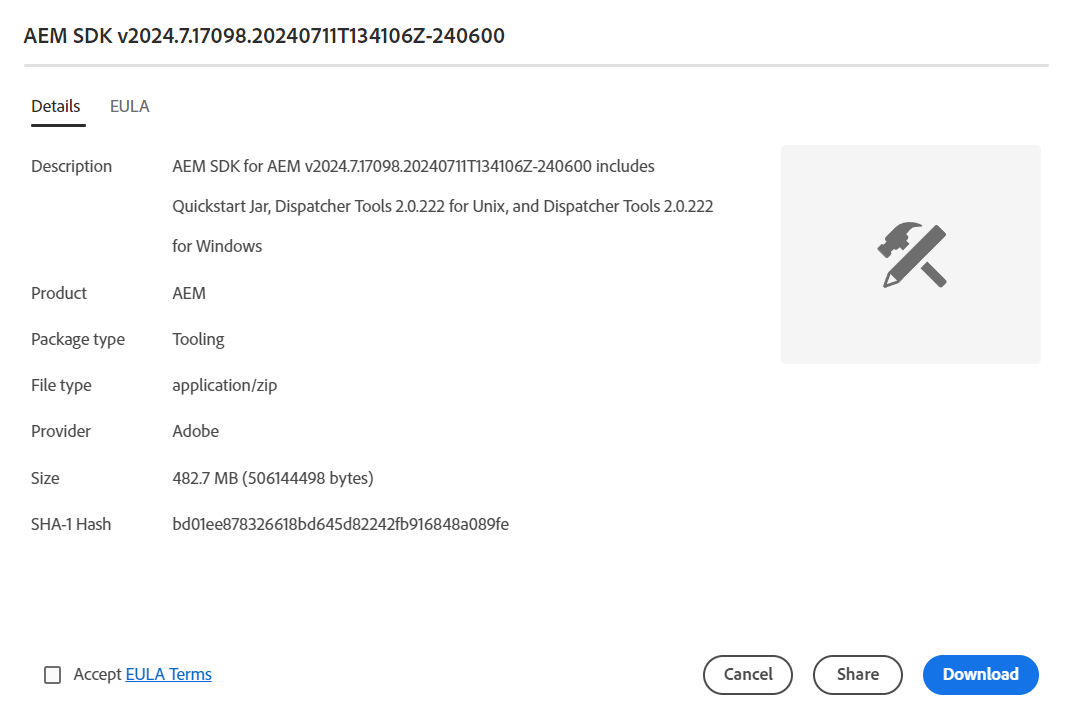
As you can see, only Windows version is available. However, the AEM SDK includes Quickstart JAR file, which can be run on other operating systems such as macOS or Ubuntu. After successfully downloading, extract the ZIP file to find the Dispatcher, AEM SDK in JAR format, or Shell script format.

Rename the AEM SDK JAR files to aem-author-p4502.jar and aem-publish-p4503.jar, and then organize them into the folder structure as outlined below.
~/aem-sdk
    /author
        + aem-author-p4502.jar
    /publish
        + aem-publish-p4503.jar
Running JAR files requires Java to be installed on your Windows machine. Ensure you have either the Java Runtime Environment (JRE) or the Java Development Kit (JDK).
> java -version
java version "11.0.15" 2022-04-19 LTS
Java(TM) SE Runtime Environment 18.9 (build 11.0.15+8-LTS-149)
Java HotSpot(TM) 64-Bit Server VM 18.9 (build 11.0.15+8-LTS-149, mixed mode)
Run the following commands in the Command Prompt.
java -jar aem-author-p4502.jar
java -jar aem-publish-p4503.jar
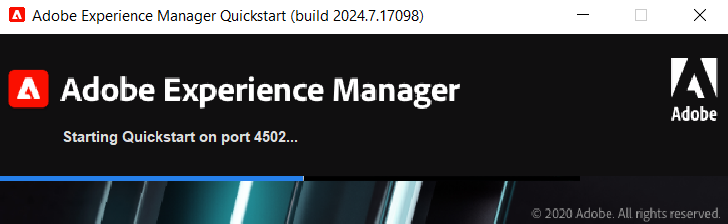
During the initial launch of the AEM SDK with either the author or publish instance, setup and installation on your operating system may take some time. Here is an example:
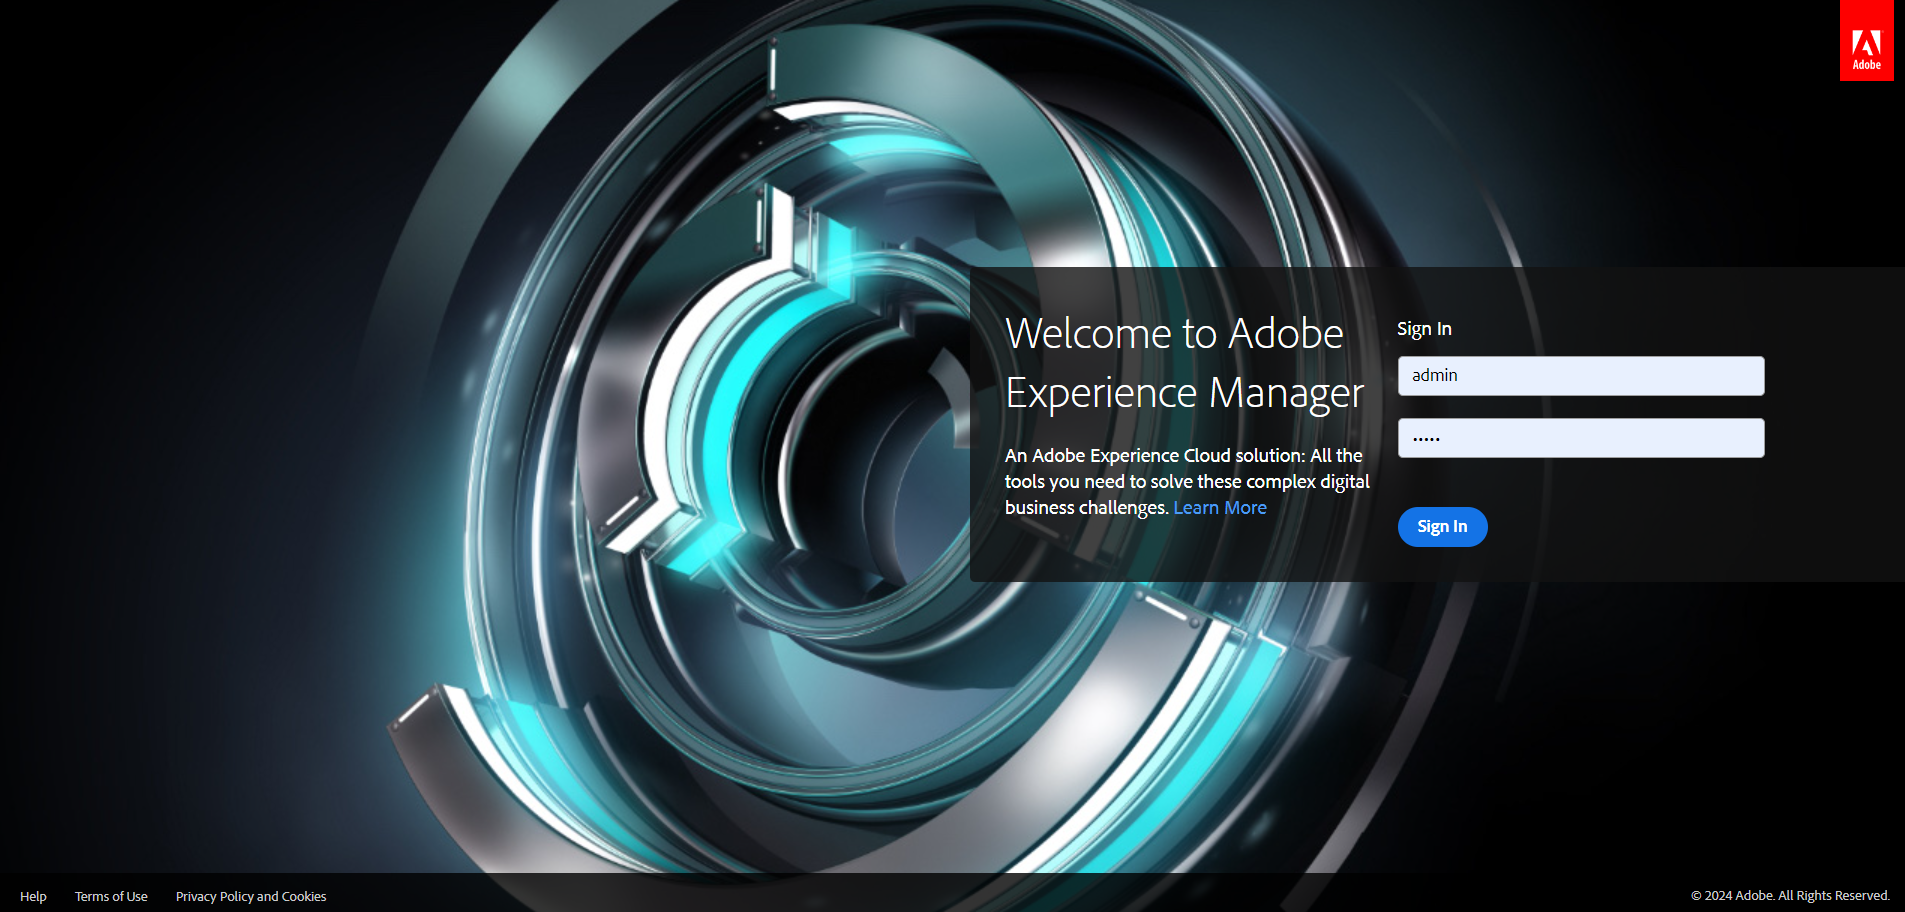
After the launching is complete, use the default credentials admin/admin to log in to the AEM console locally.
When you launch the AEM Quickstart JAR file, the crx-quickstart folder is generated. This folder is helpful for various purposes, including viewing logs located at `crx-quickstart/logs`.
access.log
access.log.2024-07-21
audit.log
auditlog.log
error.log
error.log.2024-07-21
history.log
queryrecorder.log
queryrecorder.log.2024-07-21
request.log
request.log.2024-07-21
s7access-2024-07-21.log
s7access-2024-07-23.log
stderr.log
stdout.log
upgrade.log
Moreover, if you intend to explore logs from Adobe Cloud when running AEM, you can visit this link to learn more.
II. Understand and Configure AEM Replication Agents
Replication agents in Adobe Experience Manager (AEM) are used to publish (or replicate) content from author instance to publish instance. They can also be used for reverse replication, which involves sending user-generated content from publish instance back to author instance.
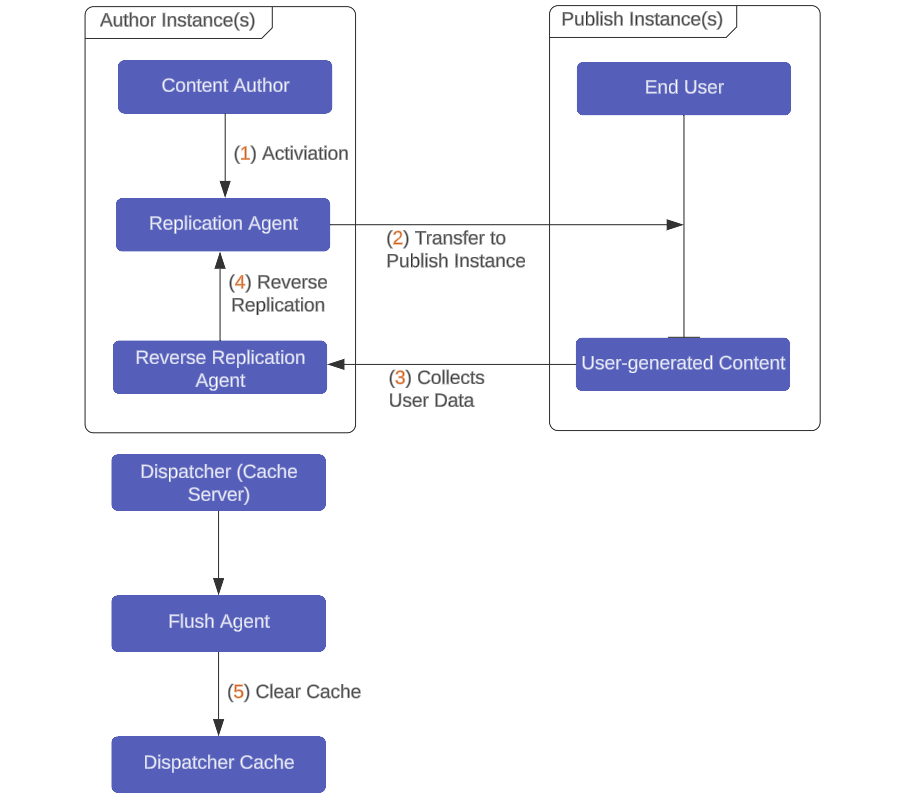
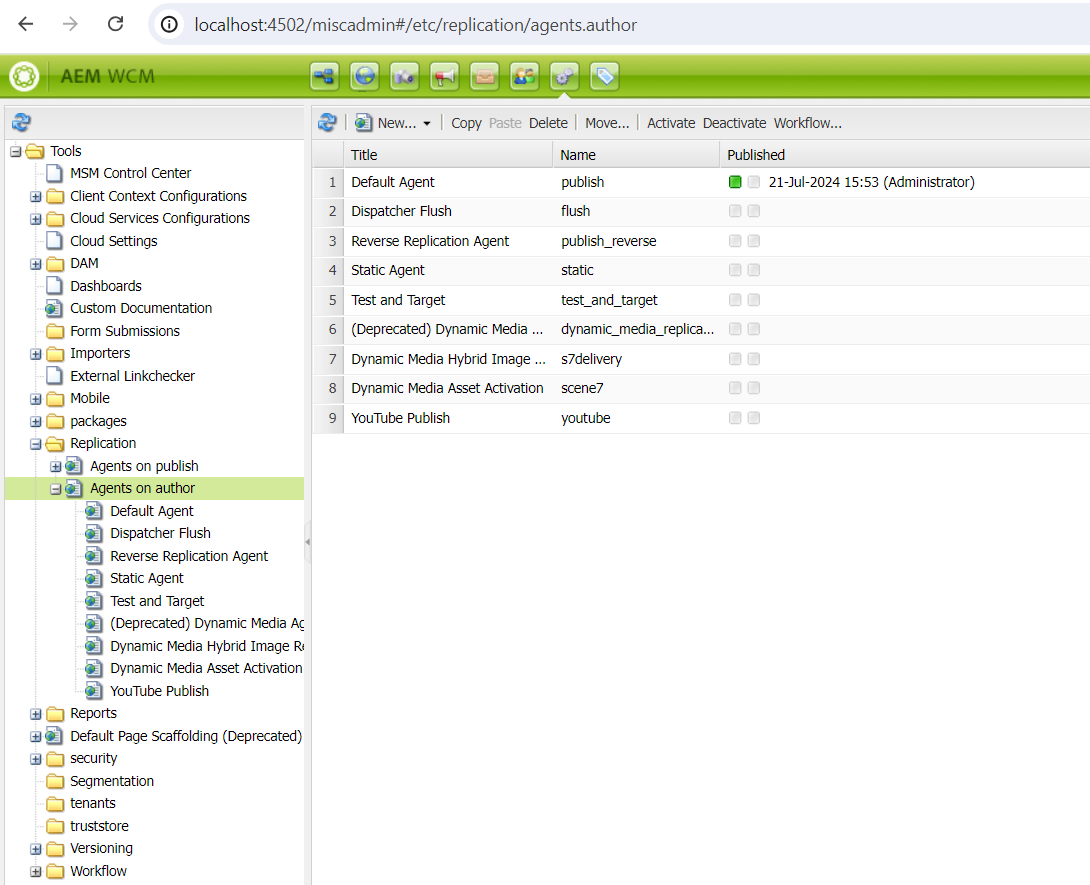
Carrying out the synchronization of data from the author instance to the publish instance in Adobe Experience Manager (AEM) requires setting up replication agents on the Agents on author.
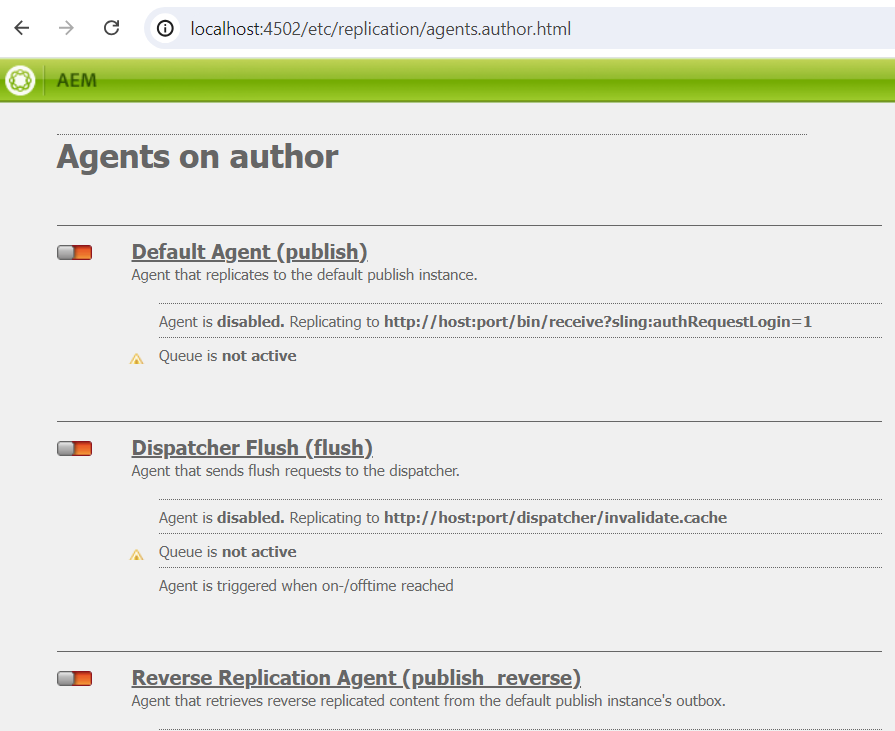
Click on the Default Agent (publish) and then click the `Edit` button to open the Agent Settings, establishing the connection between the author and publish instances.
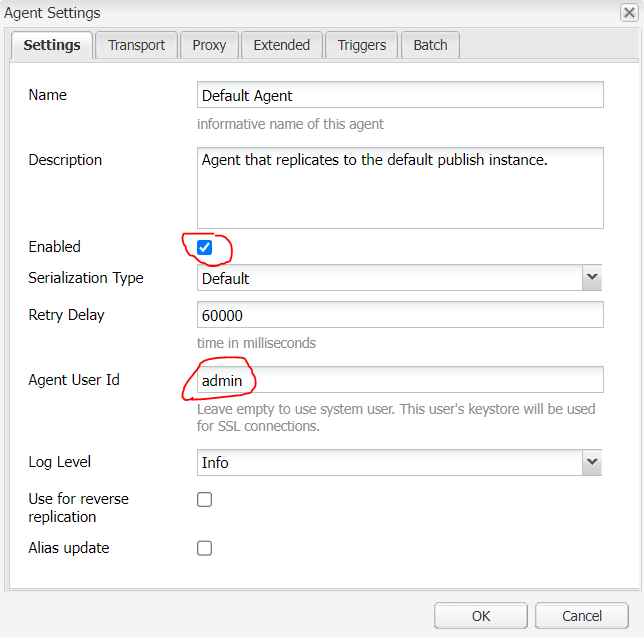
Navigate to the Transport tab to configure the URL for authentication as http://localhost:4503/bin/receive?sling:authRequestLogin=1 and use admin for both the username and password to grant access to the publish instance.
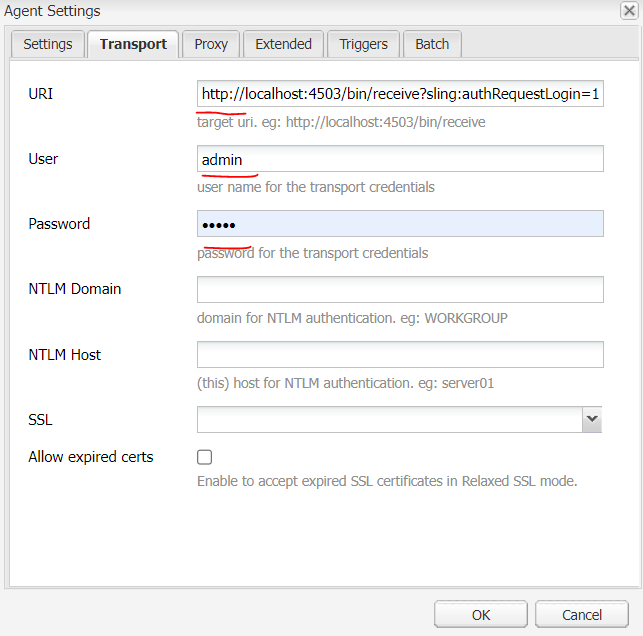
Press OK to close the Agent Settings dialog, then click on Test Connection to ensure that the agent on the author instance is successfully connected to the publish instance.

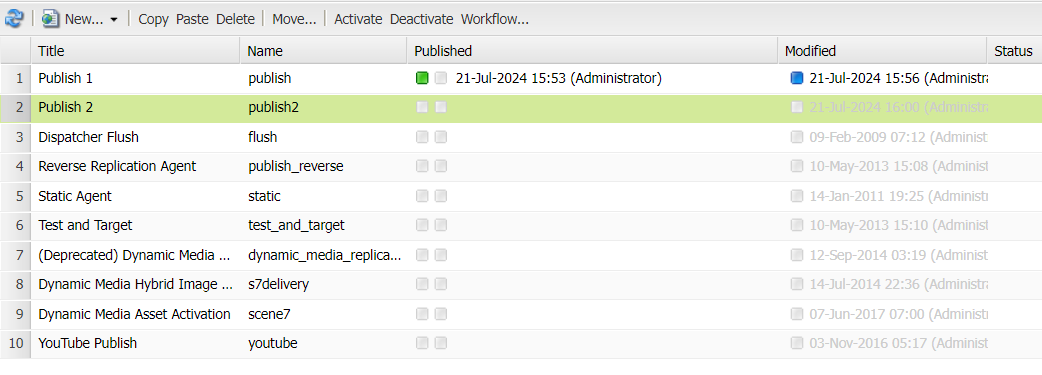
In some cases, to configure agents on author instance for multiple publish instances in Adobe Experience Manager (AEM), you will need to set up individual replication agents for each publish instance. Additionally, access the URL here for further details.
Change the Default Agent to Publish 1 for the first publish instance. Then, copy and paste this configuration to create another agent named Publish 2. Here is what you should do:
At the initial launch of an AEM instance locally, there are no AEM projects or sites to test replication between the author and publish instances. Therefore, the next step is to choose the appropriate learning path for AEM.
III. Get started with AEM Sites - WKND tutorial
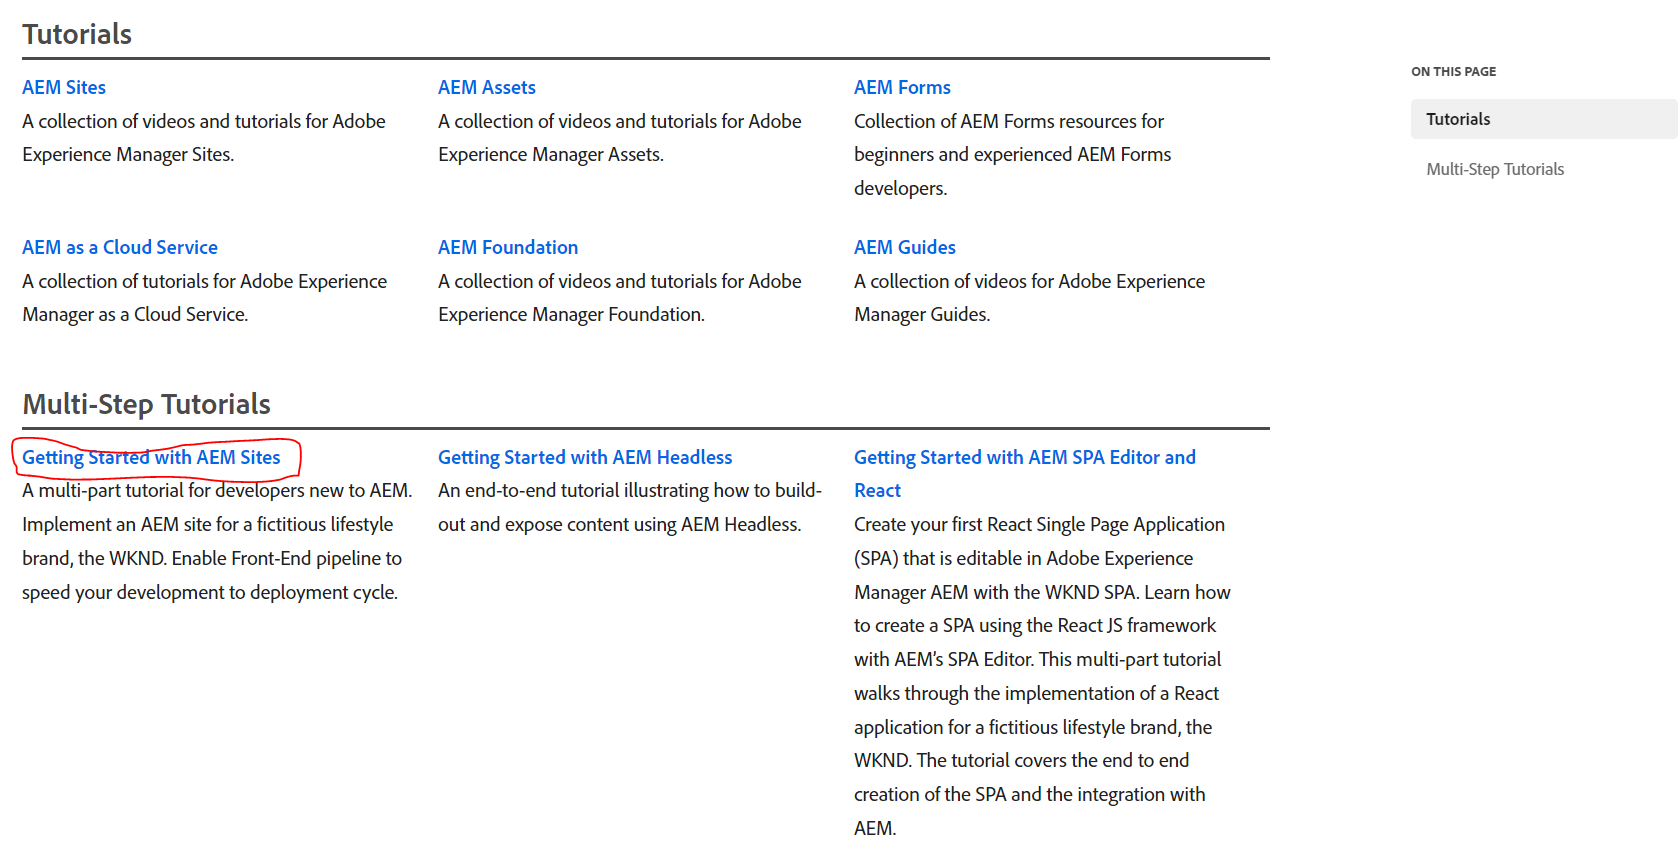
First, search for the keyword `Adobe Experience Manager Tutorial` on Google or any search tool. You can also visit this link for resources, including documents on AEM tutorials such as AEM Sites, AEM Assets, AEM Forms, AEM as a Cloud Service, and multi-step tutorials.
There are two basic approaches to starting AEM sites project:
AEM Project Archetype: The traditional method using a Maven template to create minimal AEM project. Ideal for AEM 6.5/6.4 and AEM as a Cloud Service projects with heavy customization needs. Start the tutorial with the AEM Project Archetype.
AEM Site Templates: A low-code approach for quick site creation using pre-defined templates. Suitable for new projects and developers, applying styles with CSS and JavaScript. Available only for AEM as a Cloud Service. Start the tutorial using a Site Template.
Choose AEM Project Archetype if you don't have an account to create an AEM site in Adobe Cloud. Leverage the Maven command with specific parameters to achieve high customization, allowing the creation of AEM projects that meet your unique requirements.
mvn -B org.apache.maven.plugins:maven-archetype-plugin:3.2.1:generate \
 -D archetypeGroupId=com.adobe.aem \
 -D archetypeArtifactId=aem-project-archetype \
 -D archetypeVersion=40 \
 -D appTitle="TUTORIAL" \
 -D appId="tutorial" \
 -D groupId="com.tutorial" \
 -D aemVersion=6.5.5 \
 -D singleCountry=n
Note: Make sure Maven is installed locally and check the version using the command `mvn -version`. Refer to the AEM project archetype versions released here.
After successfully generating an AEM project using AEM Project Archetype version 49, install IntelliJ IDE to load the project and view its overall structure.
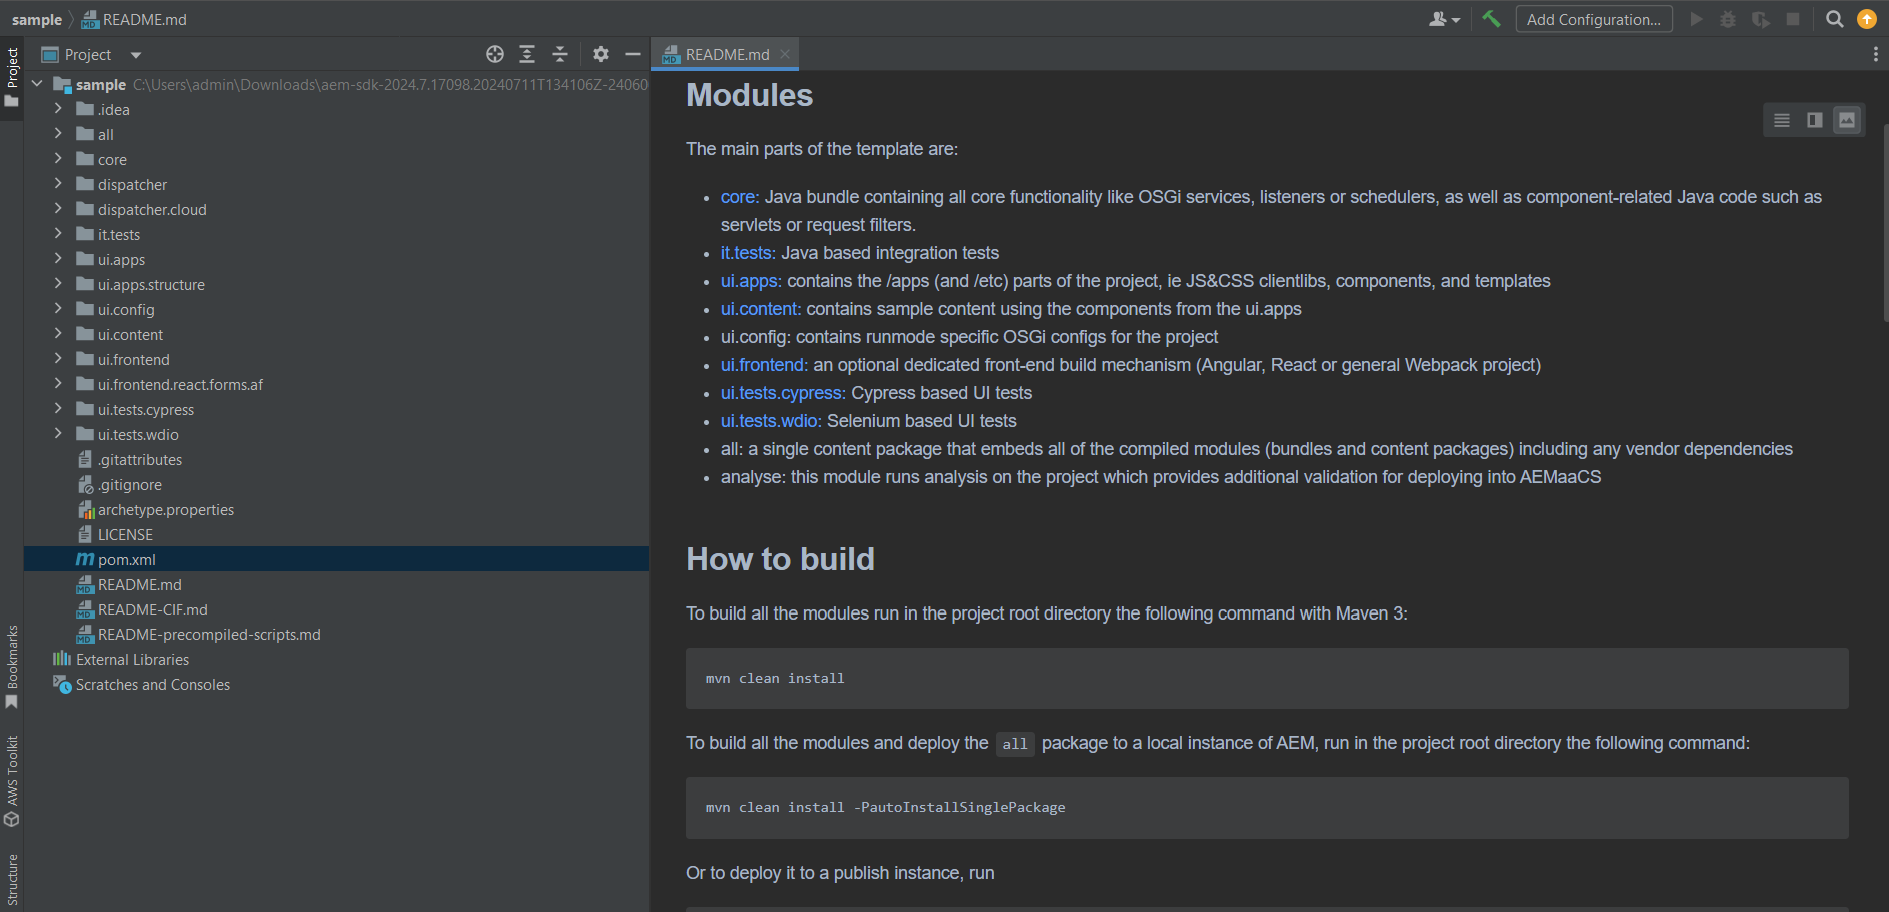
Usually, the first step in approaching an AEM project involves referring to the `README.md` file. This file explains the main modules of the AEM project and the commands needed to run each module. While it may not cover everything in detail, it provides a helpful overview.
Since some modules in the AEM project may not work properly locally, comment out those modules in the `pom.xml` file at the global scope as shown below.
<modules>

  <module>all</module>

  <module>core</module>

  <module>ui.frontend</module>

  <module>ui.apps</module>

  <module>ui.apps.structure</module>

  <module>ui.config</module>

  <module>ui.content</module>

  <module>it.tests</module>

  <module>dispatcher</module>

  <module>ui.tests</module>

</modules>
If you encounter the issue com.adobe.cq.forms.core.components.models.aemform while running the command `mvn -PautoInstallPackage -Padobe-public clean install` from this link, search for `aem-forms-sdk-api` on https://mvnrepository.com/ and configure the dependency in the all/pom.xml file.
			<embedded>
				<groupId>com.adobe.aem</groupId>
				<artifactId>aem-forms-sdk-api</artifactId>
				<target>/apps/tutorial-vendor-packages/application/install</target>
			</embedded>
            ...

<!--        <dependency>-->
<!--            <groupId>com.tutorial</groupId>-->
<!--            <artifactId>tutorial.ui.apps</artifactId>-->
<!--            <version>${project.version}</version>-->
<!--            <type>zip</type>-->
<!--        </dependency>-->
<!--        <dependency>-->
<!--            <groupId>com.tutorial</groupId>-->
<!--            <artifactId>tutorial.ui.content</artifactId>-->
<!--            <version>${project.version}</version>-->
<!--            <type>zip</type>-->
<!--        </dependency>-->
<!--        <dependency>-->
<!--            <groupId>com.tutorial</groupId>-->
<!--            <artifactId>tutorial.ui.config</artifactId>-->
<!--            <version>${project.version}</version>-->
<!--            <type>zip</type>-->
<!--        </dependency>-->

        <dependency>
            <groupId>com.adobe.cq</groupId>
            <artifactId>core.wcm.components.content</artifactId>
            <type>zip</type>
        </dependency>
        <dependency>
            <groupId>com.adobe.cq</groupId>
            <artifactId>core.wcm.components.config</artifactId>
            <type>zip</type>
        </dependency>
        <dependency>
            <groupId>com.adobe.aem</groupId>
            <artifactId>aem-forms-sdk-api</artifactId>
            <version>2024.04.18.00-240300</version>
        </dependency>
Note: We recommend commenting out `com.tutorial` to avoid errors when running the command `mvn clean install` in all modules to install dependencies related to AEM project. After that, you can uncomment it or add `includeFormsenrollment=y` to the AEM project archetype generation command.
In some cases, you can resolve issues by removing the `adaptiveForm` or `commerce` module in the AEM component, deleting certain contents in `ui.content/src/main/content/jcr_root/content/dam`, and modifying the filter file.

Configure `ui.content/src/main/content/META-INF/vault/filter.xml` to remove references to the adaptiveForm and commerce folders.
<?xml version="1.0" encoding="UTF-8"?>
<workspaceFilter version="1.0">
    <filter root="/conf/tutorial" mode="merge"/>
    <filter root="/content/tutorial" mode="merge"/>
    <filter root="/content/experience-fragments/tutorial" mode="merge"/>
</workspaceFilter>
Delete the `apps/tutorial/components/adaptiveForm` and `apps/tutorial/components/commerce` directories, then run the command mvn -PautoInstallPackage -Padobe-public clean install again.
[INFO]
[INFO] Tutorial ........................................... SUCCESS [  0.389 s]
[INFO] Tutorial - All ..................................... SUCCESS [  2.141 s]
[INFO] Tutorial - Core .................................... SUCCESS [ 10.877 s]
[INFO] Tutorial - UI Frontend ............................. SUCCESS [ 45.166 s]
[INFO] Tutorial - Repository Structure Package ............ SUCCESS [  1.043 s]
[INFO] Tutorial - UI apps ................................. SUCCESS [  8.794 s]
[INFO] Tutorial - UI config ............................... SUCCESS [  1.033 s]
[INFO] Tutorial - UI content .............................. SUCCESS [  9.430 s]
[INFO] Tutorial - Integration Tests ....................... SUCCESS [ 10.458 s]
[INFO] Tutorial - Dispatcher .............................. SUCCESS [  0.284 s]
[INFO] Tutorial - UI Tests ................................ SUCCESS [  2.686 s]
[INFO] ------------------------------------------------------------------------
[INFO] BUILD SUCCESS
[INFO] ------------------------------------------------------------------------
[INFO] Total time:  01:34 min
[INFO] Finished at: 2024-07-23T07:56:24+07:00
[INFO] ------------------------------------------------------------------------
IV. Debug AEM Projects Using Popular IDEs
In this section, we will explore some of the most popular IDEs used for developing AEM projects. Specifically, we will discuss how IntelliJ IDEA and Visual Studio Code support AEM development, as introduced by Adobe. Additionally, we will cover debugging techniques to help identify and resolve issues during programming.
IntelliJ IDEA: Powerful, feature-rich integrated development environment (IDE), widely used by developers for various programming languages. For more information, visit the IntelliJ IDEA website.

Note: You can take advantage of the free 30-day trial to get your first look at this IDE. If you find the tool valuable and wish to continue using it, you can upgrade your account to a premium subscription.
Open your AEM project in IntelliJ IDEA, then click Add Configuration... to access the Run/Debug Configurations. Click the + button and select Remote JVM Debug. Rename the default configuration, `Unnamed` to `AEM Debug`.
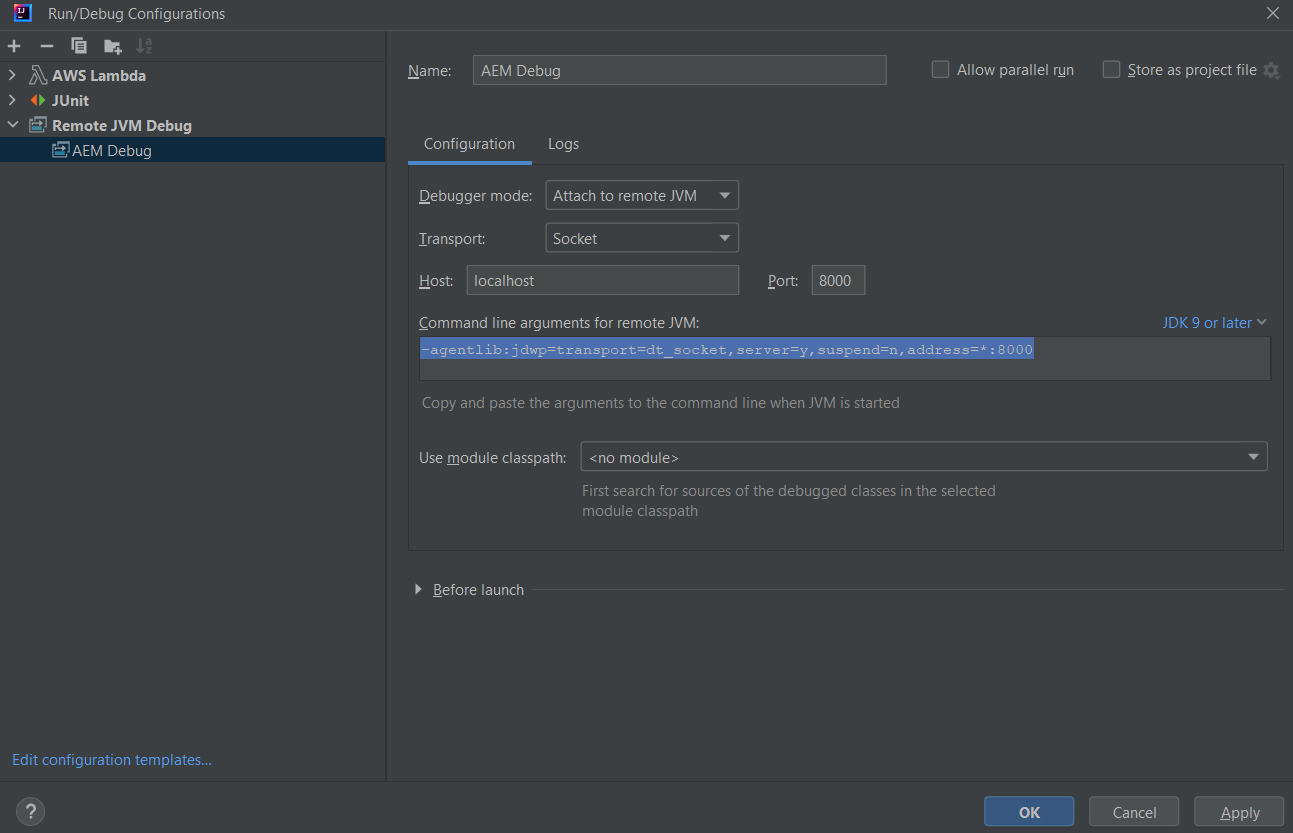
If port 8000 is already in use, switch to another port by modifying the port number and the command line argument for the remote JVM.
-agentlib:jdwp=transport=dt_socket,server=y,suspend=n,address=*:8000
When setting up Remote JVM Debug, create `.bat` (or `.sh` for Unix-based systems) file to configure and launch the JVM with the appropriate debugging options. Avoid starting the AEM Quickstart JAR file directly.
» start-debug.bat
cd C:\Users\admin\Downloads\digitalexperienceplatform\aem-sdk\author
C:
java -Xmx2048m -XX:PermSize=256m -XX:MaxPermSize=512m -agentlib:jdwp=transport=dt_socket,address=8000,server=y,suspend=n -jar aem-author-p4502.jar -v
pause
After running the `start-debug.bat` file, the AEM console will start on port 4502. In IntelliJ IDEA, enable AEM Debug to listen on port 8000 for interactions occurring on port 4502.
...
Opening browser using cmd=rundll32 url.dll,FileProtocolHandler "http://localhost:4502/"
Startup time:53 seconds
http://localhost:4502/
Quickstart started
Debugger failed to attach: handshake failed - received >GET /sites.htm< - expected >JDWP-Handshake<
Debugger failed to attach: handshake failed - received >GET /sites.htm< - expected >JDWP-Handshake<
Debugger failed to attach: handshake failed - received >GET /sites.htm< - expected >JDWP-Handshake<
Debugger failed to attach: handshake failed - received >GET /sites.htm< - expected >JDWP-Handshake<
Debugger failed to attach: handshake failed - received >GET /sites.htm< - expected >JDWP-Handshake<
Debugger failed to attach: timeout during handshake
Debugger failed to attach: timeout during handshake
Listening for transport dt_socket at address: 8000
...
Identify the page that includes the Hello World Component, such as http://localhost:4502/editor.html/content/tutorial/us/en.html, and choose the `View as Published` option. We will use Sling model associated with the Hello World Component to debug it as Java class.
Visual Studio Code (VS Code): Lightweight yet powerful code editor developed by Microsoft. You can download it for developing AEM projects from Visual Studio Code's official website.
Navigate to the `tutorial` folder, then use the `code .` command to open the folder in Visual Studio Code. Next, open the terminal inside folder `author` and start with the command below.
java -agentlib:jdwp=transport=dt_socket,server=y,suspend=n,address=5005 -jar aem-author-p4502.jar
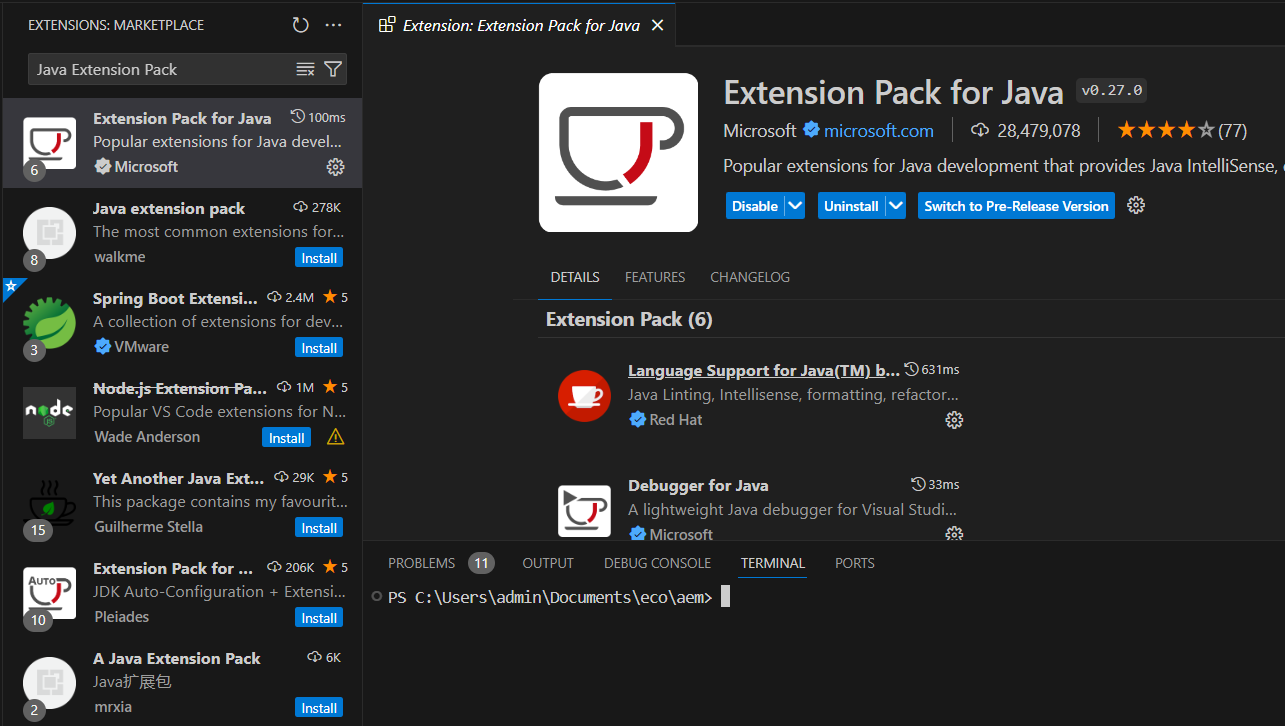
Go to the Extensions Marketplace in VS Code and install the Extension Pack for Java.
In VS Code, go to Debug mode, click `create a launch.json file`, and then click `Add Configuration` to set up remote debugging for AEM.
{
    // Use IntelliSense to learn about possible attributes.
    // Hover to view descriptions of existing attributes.
    // For more information, visit: https://go.microsoft.com/fwlink/?linkid=830387
    "version": "0.2.0",
    "configurations": [
        {
            "type": "java",
            "name": "Debug (Attach) - Remote AEM",
            "request": "attach",
            "hostName": "localhost",
            "port": "5005",
            "projectName": "tutorial.core"
        },
        {
            "type": "java",
            "name": "Current File",
            "request": "launch",
            "mainClass": "${file}"
        }
    ]
}
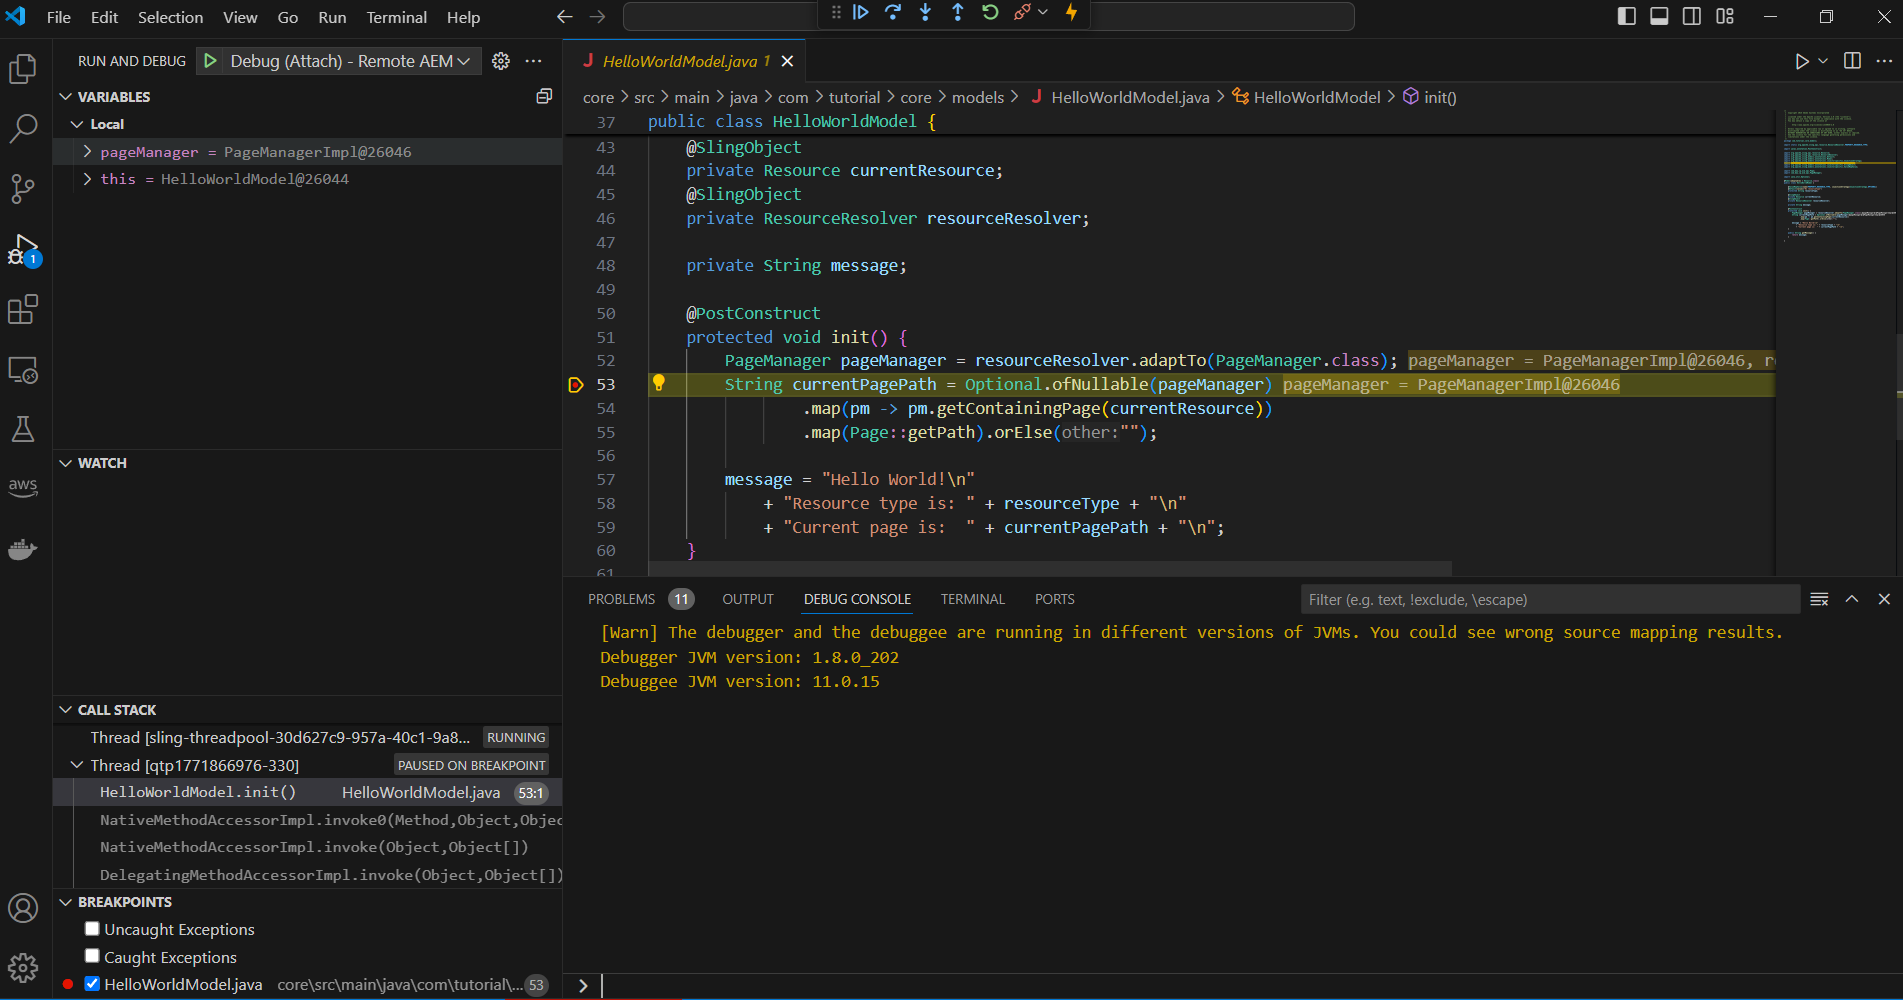
Save the configuration and click `Debug (Attach) - Remote AEM` in VS Code to start listening for debug sessions on port 5005.

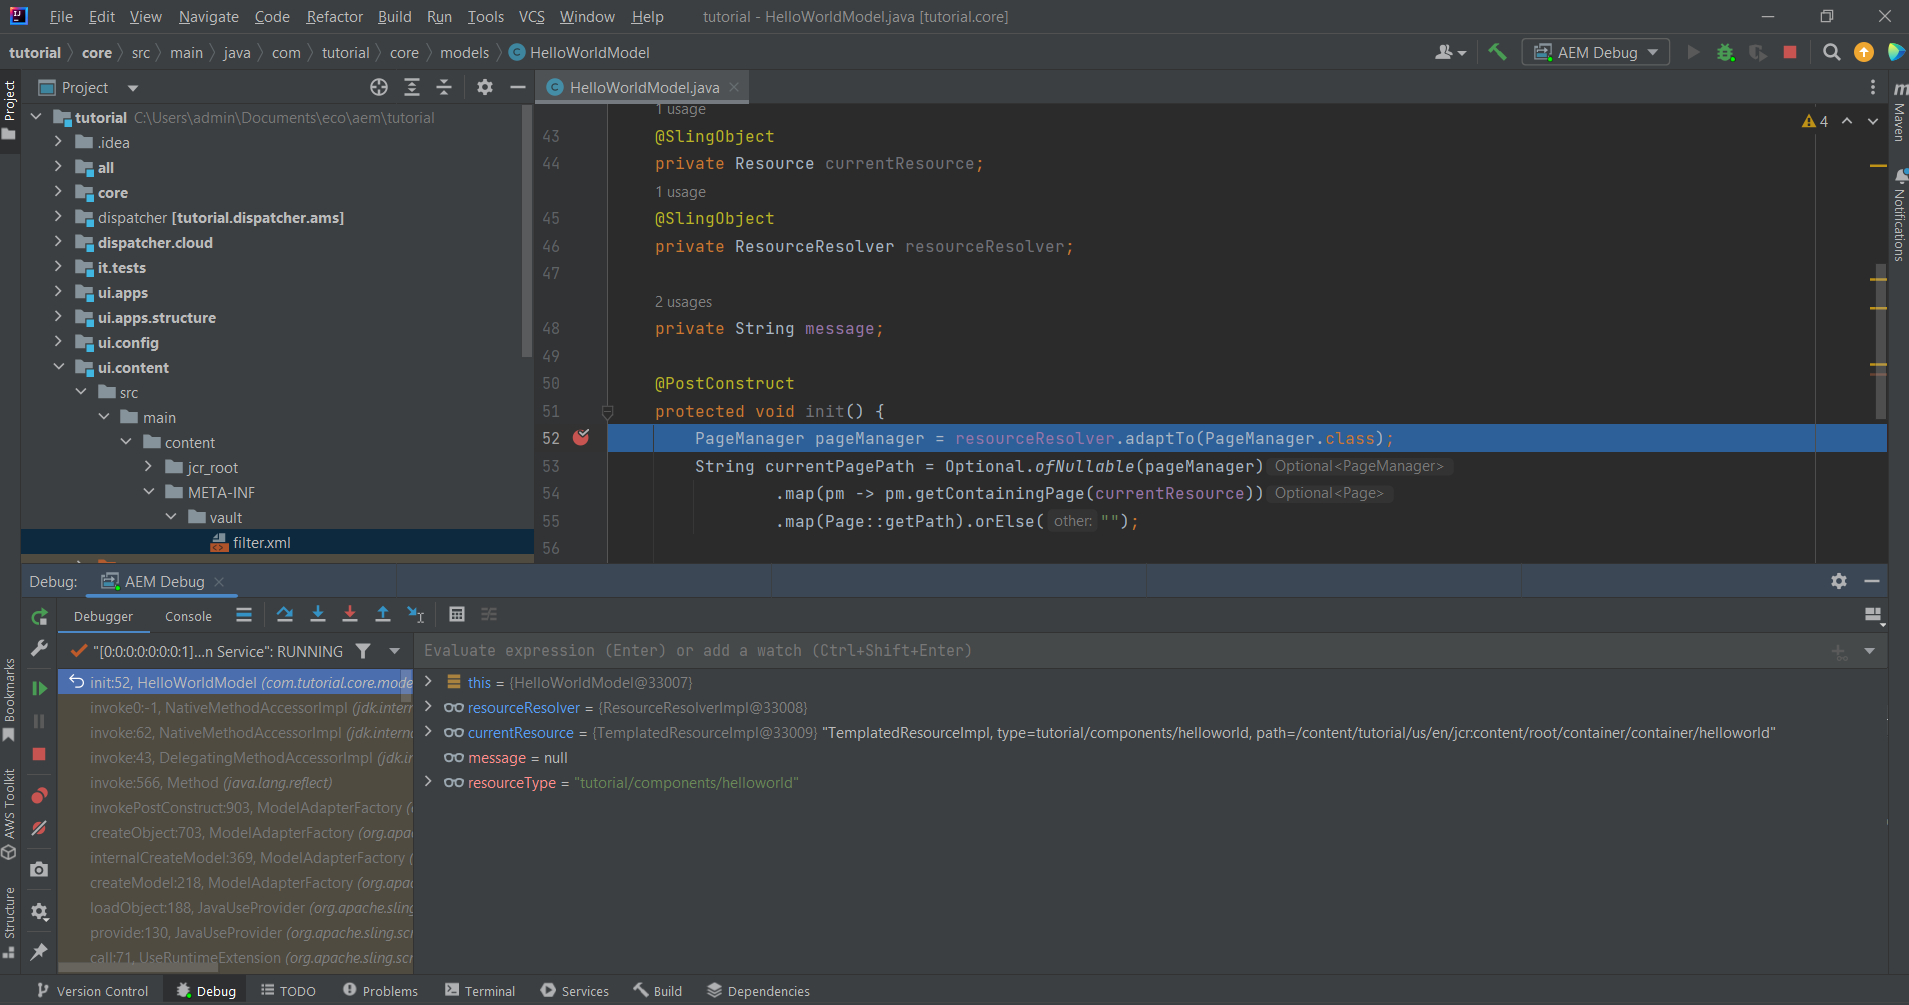
Set breakpoint in Java class, such as HelloWorldModel.java in the core module, and observe the results as shown below.
Go
V. Video